Details
| Title | Dedicated Utility for PS6000 Series |
|---|---|
| Supported OS | Windows 10 IoT Enterprise 2019 LTSC 64bit |
| Description | When install this utility to your product, your product can use the following feature. Please refer to the user manual of product about each feature detail. Utility Name
Write FilterWhen you use the Write Filter feature, you have to enable the following setting.
Control Panel > Programs > Program and Features > Turn Windows features on or off > Device Lockdown > Unified Write Filter: Enable 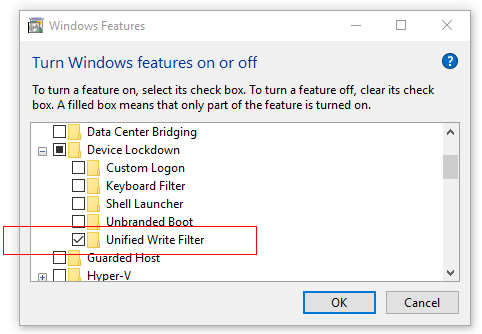 System MonitorWhen you use the System Monitor feature, you have to do the following contents.
|
How to Install
-
- Download the following data from download page of “Microsoft Visual C++ Redistributable Package” and Execute it. File name may be changed by Microsoft.
Microsoft Visual C++ Redistributable Package- vc_regist.x86.exe
- vc_regist.x64.exe
- Download the following data from download page of “.NET Framework 4.8 Offline Installer” and Execute it. File name may be changed by Microsoft.
.NET Framework 4.8 Offline Installer- ndp48-x86-x64-allos-enu.exe
- Could you download a latest module of Node.js LTS for Windows Installer(.msi) 64bit from a link.
Download Link - Download the following data from Pro-face Web Page.
- Display Communication USB Driver.zip
- PFXPHMIP6_Driver_Installer_Ver.x.x.zip
- PFXPHMIP6_Utility_Installer_Ver.x.x.zip
- Extract the download data.
- Execute the “dpinst.exe”.
- Execute "Get-ExecutionPolicy" on PowerShell with Administrator right.
Take a note of output string from "Get-ExecutionPolicy". For example, "Allsigned, Bypass, Restricted, RemoteSigned, Unrestricted, or Undefined".
- Execute "Set-ExecutionPolicy Allsigned" on PowerShell and enter "A" when prompted.
- Execute "SchneiderCertification_202103.ps1" and SchneiderCertification_202104.ps1 on PowerShell and input "A" for the request from PowerShell Command.
Never select [V] Never run, as you will need to reinstall the OS.
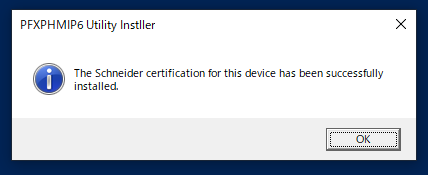
- Push "OK" on Dialog.
- Close the PowerShell Window.
- Execute the “PFXPHMIP6_Driver_Installer_Ver.x.x.exe”.
- Execute the “PFXPHMIP6_Utility_Installer_Ver.x.x.exe”.
- Execute "Set-ExecutionPlicy [You use your noted string at the No7.]" command on PowerShell with Administator right and enter "A" when prompted.
- Restart your product.
- Installing Node-RED、node-red-dashboard
Connect your PS6000 Series to the Internet to Execute online installation.
Open "Node.js command prompt" from the start menu and execute the following command> npm i -g --unsafe-perm node-red
> npm i -g node-red-dashboard - Installing dedicated Node for this product
> cd "C:\Program Files\Schneider Electric\Utilities\SystemMonitor\packages"
> npm i -g node-sep6platform-1.0.0.tgz
> npm i -g node-red-contrib-sep6psensor-1.0.0.tgz
> npm i -g node-sep6sensor-1.0.0.tgz
> npm i -g node-red-contrib-sep6platform-1.0.0.tgz - Delete an existing Node-RED environment setting
If the C:\AboutPointPointPointPointPoint.node-red folder is present at this point, delete it. - Install an Edge with Online.
- Execute the "Windows Update".
- Download the "Windows10.0-KB4541301-x64.cab"
- Execute "dism.exe /online /Add-Package /Packagepath:.\Windows10.0-KB4541301-x64.cab" on command prompt with Administrator right.
Note: Instal an Edge with Stand-alone- Download the "windows10.0-kb4601383-x64.msu".
- Download the "Windows10.0-KB4541301-x64.cab".
- Excute the "windows10.0-kb4601383-x64.msu".
- Execute "dism.exe /online /Add-Package /Packagepath:.\Windows10.0-KB4541301-x64.cab" on command prompt with Administrator right.
- Confirmation of System Monitor launching
Execute the Application Launcher.
"C:\Program Files\Schneider Electric\Utilities\AppLaunchanger\AppLaunchanger.exe"
When the System Monitor icon of the Application Launcher is clicked, System Monitor is launched.
- Download the following data from download page of “Microsoft Visual C++ Redistributable Package” and Execute it. File name may be changed by Microsoft.
Terms of use / Cautions
Please acknowledge the following terms of use before you use our download service.Download of any file signifies your agreement to the terms of use.
Terms and conditions
Download file
1.11 MB (1,167,264 Byte)
3.14 MB (3,290,825 Byte)
2.09 MB (2,194,123 Byte)
73.25 MB (76,812,901 Byte)
383.07 MB (401,674,480 Byte)
Update history
(Mar. 18, 2022)
PS6000_PFXPHMIP6_Utility_Installer_Ver.3.0- Fixed a problem that Windows Broadcase Message cannot appropriately process.
(Aug. 31, 2021)
Updated PS6000_PFXPHMIP6_Utility_Installer_Ver.2.1- Updated 4gCellularControl.exe V1.2.0.0
(Aug. 6, 2021)
Updated some DriversAdded a Brightness and 4G Cellular Utility.
(Oct. 22, 2020)
New CreateSetup certificate data
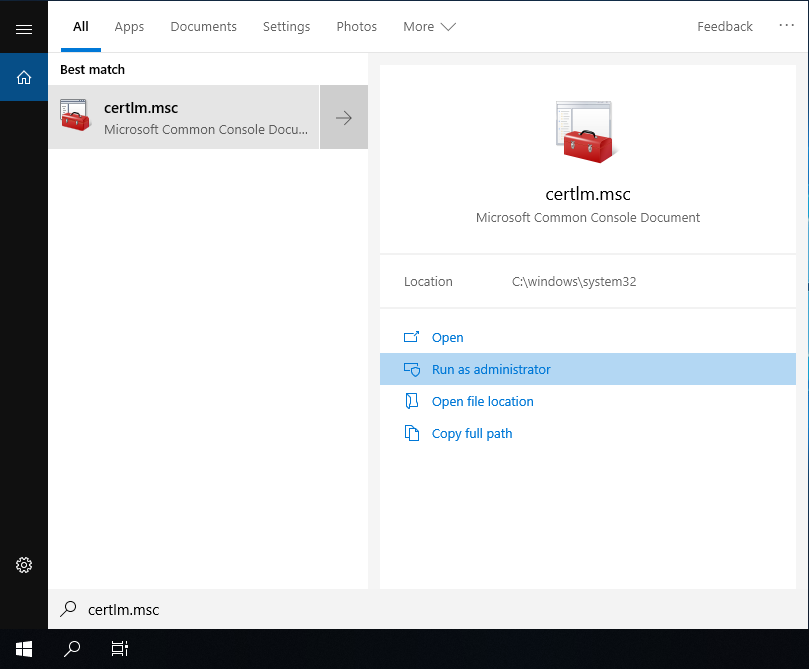
- Run "certlm.msc" as an administrator.
Type "certlm.msc" in the search box and select "Run as administrator".
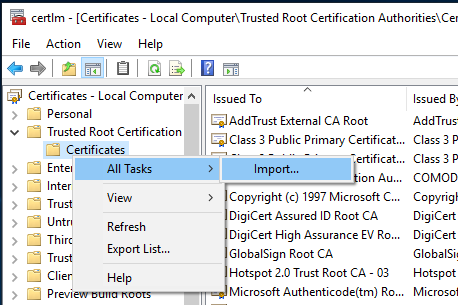
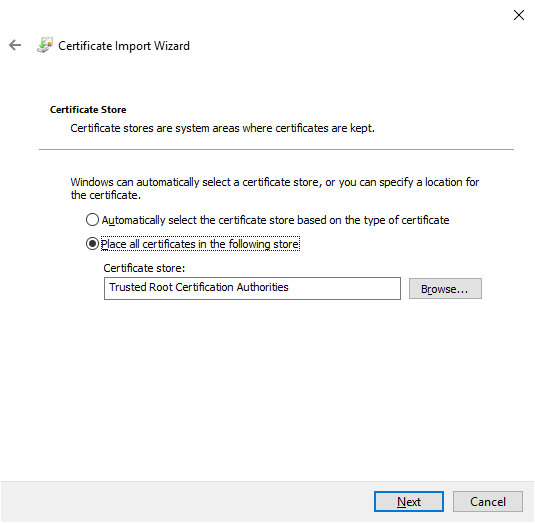
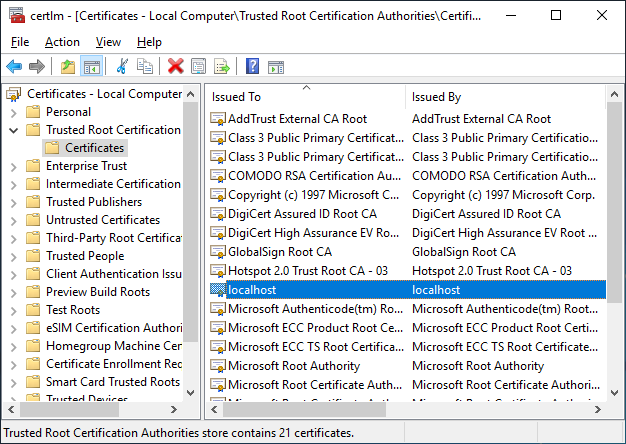
- Import the "c:\Program Files\Schneider Electric\Utilities\SystemMonitor\cert\server.crt" to Certificates - Local Computer\Trusted Root Certification\Certificater.
- After installed, localhost certificate will be appeared.



Summary
Last update:2022/03/18