Legal Information
The Pro-face brand and any trademarks of Schneider Electric SE and its subsidiaries referred to in this guide are the property of Schneider Electric SE or its subsidiaries. All other brands may be trademarks of their respective owners. This guide and its content are protected under applicable copyright laws and furnished for informational use only. No part of this guide may be reproduced or transmitted in any form or by any means (electronic, mechanical, photocopying, recording, or otherwise), for any purpose, without the prior written permission of Schneider Electric. Schneider Electric does not grant any right or license for commercial use of the guide or its content, except for a non-exclusive and personal license to consult it on an "as is" basis. Schneider Electric products and equipment should be installed, operated, serviced, and maintained only by qualified personnel.
As standards, specifications, and designs change from time to time, information contained in this guide may be subject to change without notice.
To the extent permitted by applicable law, no responsibility or liability is assumed by Schneider Electric and its subsidiaries for any errors or omissions in the informational content of this material or consequences arising out of or resulting from the use of the information contained herein.
Overview
This document describes information on the following topics for use of PS6000 Series (hereinafter referred to as this product).
- Security measures
- How to use System Monitor Sample Dashboard (hereinafter referred to as System Monitor)
- Dedicated Node for this product.
- System Monitor API
- System Monitor FAQ
- 16DI/8DO API
Update history
- Jul. 27, 2021 Added System Monitor API, 16DI/8DO API
Table of Contents
Network protection
- When using this product in a network environment, keep a network to be constructed secured. (For example, installing network security devices such as Firewall device).
For details, ask the administrator of networks for equipment
Security update of the OS (Windows) on this product
- The OS on this product is Windows IoT Enterprise 2019 LTSC.
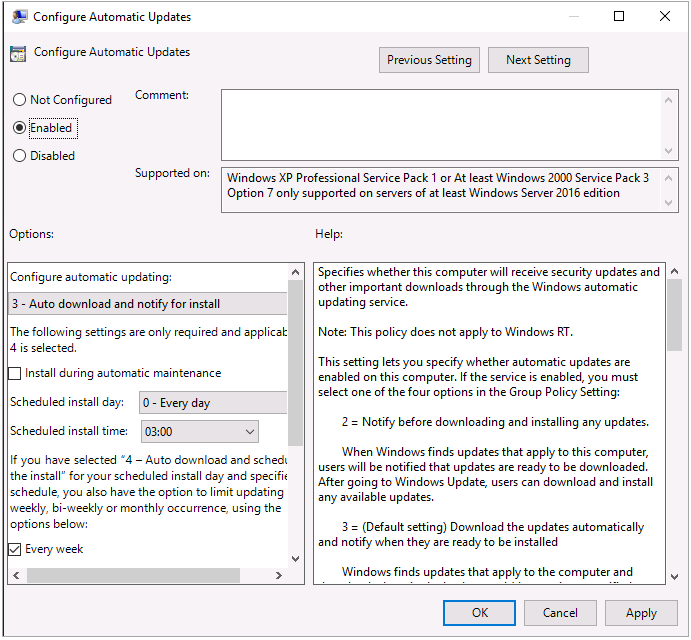
- Windows Automatic Update is set to be disabled by the factory default in the policy setting. Change the setting if automatic update is needed.
How to enable Windows Automatic Update - When using Write Filter, update with the Write Filter disabled.
- Always apply security update (QFE) to keep the OS up-to-date even after installing this product in your environment.
- If the use environment does not allow you to apply security update regularly, it is recommended to take a security measure with a allowlist method by purchasing our optional McAfee license.
Account type
- At the time of usual use, use the user created as Standard User for the account type. Only when the system settings need to change, use the user whose account type is Administrator.
Create a Standard User account
Security update of Node.js
- Node.js (16.x.x LTS) for the Windows x64 environment is installed in this product. Check release information on security update and keep Node.js up-to-date.
- You can update Node.js by installing the latest version with an administrator account.
- When you update Node.js, make all the other users who have already signed in sign out and then update with a single user signed in.
- The execution environment and the settings of Node.js are retained in every user account. If a Standard User account only for usual operation is used, when updating Node.js, it is necessary to copy the updates to every user account. For Standard User accounts with security measures taken, update might not be processed. Copy the updates from a user account with administrative rights to every user account.
Security update of Node-RED
- Node-RED is installed in this product. Check release information on security update and keep Node-RED up-to-date.
- The execution environment of Node-RED is retained in every user account. When updating Node-Red, copying the updates to every user account is necessary.
- If a new user account has been added to Windows after update of Node-RED, when System Monitor is started with the added user account for the first time, the Node-RED factory default environment is generated as an execution environment for the new user account. When a new user account is created, update Node-RED after starting System Monitor.
- When a Standard User account only for usual operation is used, exit Node.js and update Node-RED by executing Node.js command prompt with administrative rights temporarily only at the time of update.
Environment settings of Node-RED
- The environment setting file of Node-RED is retained in every user account. When changing the settings, change the settings with every user account.
Username and Password of Node-RED flow editor
- The default username is [admin] and the password is [Pw#12345].
- Change the username and the password of Node-RED after the first login. For how to change, refer to the following URL.https://nodered.org/docs/user-guide/runtime/securing-node-red
- The expiration date of log-in information -token- is 7 days by default. If you log into the flow editor and close it without logout, the log-in state is retained for 7 days. When closing the editor screen, make sure that you log out.
- The way to change the expiration date of the log-in information -token- is also described in the URL above.
Port number used for Node-RED
- Node-RED uses TCP Port 1880 by default. When the port number is used in another application, use another port number.
- If the port number of Node-RED needs to be changed, refer to the following URL.
https://nodered.org/docs/user-guide/runtime/configuration
Important notes for starting Node.js and Node-RED at system startup
- As described in the following URL, if you configure Windows Service settings to automatically start Node.js and Node-RED at system startup, you can run the flow without log-in. However, if the service is started with the system account, all operations, such as OS setting changes, will become possible due to the flow. Configure the settings taking into account that security risk of the system may increase.
https://nodered.org/docs/faq/starting-node-red-on-boot - On the pre-installed OS of this product, to increase the security, Node.js and Node-RED are configured to be run with a user account that you log into.
Protection of the Node-RED environment
- The Node-RED configuration file is saved in the %USERPROFILE% folder. You can freely edit or delete the file even with a Standard User account. Changing the access authority of the Node-RED configuration file in the following steps can increase the safety level of the system.
File Access Right Setting
How to enable Windows Automatic Update
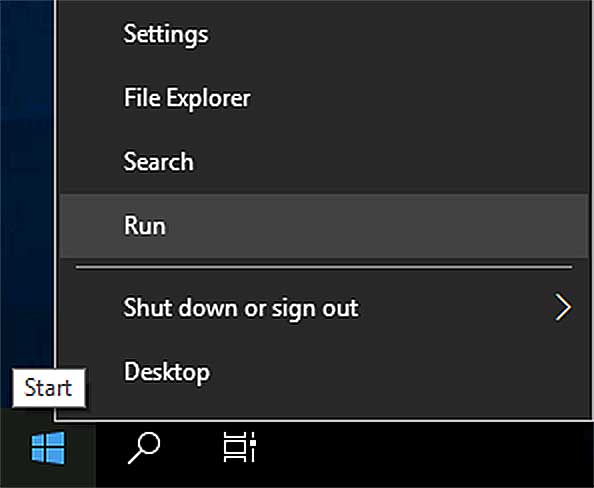
- Right click the Start button and Select Run.
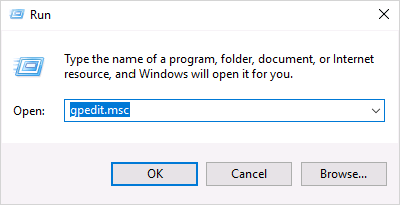
- Type "gpedit.msc" and click [OK].
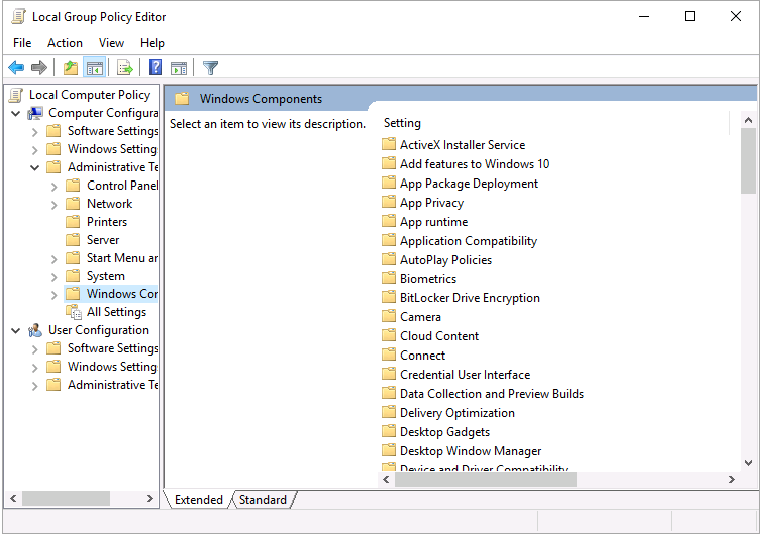
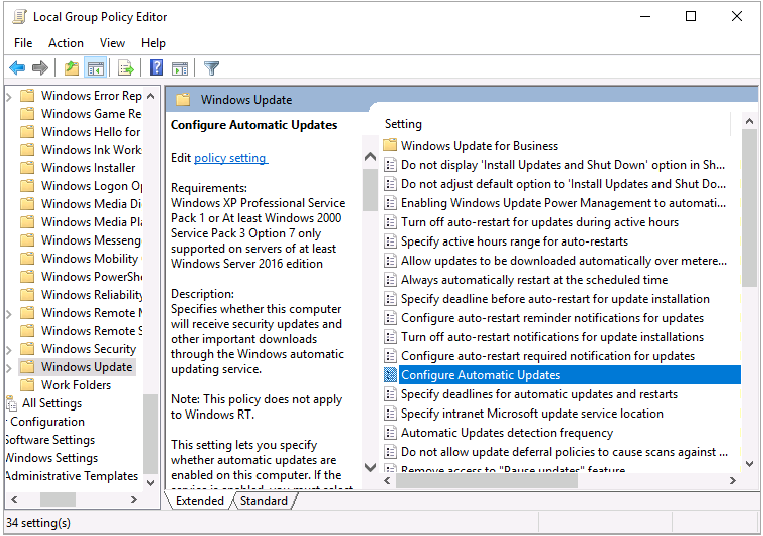
- Open “Computer Configuration\Administrative Templates\Windows Components\Windows Update\Configure Automatic Update” .
- Change the setting [Disable] to [Enable] and select [Options] settings according to the using environment.
Create a Standard User account
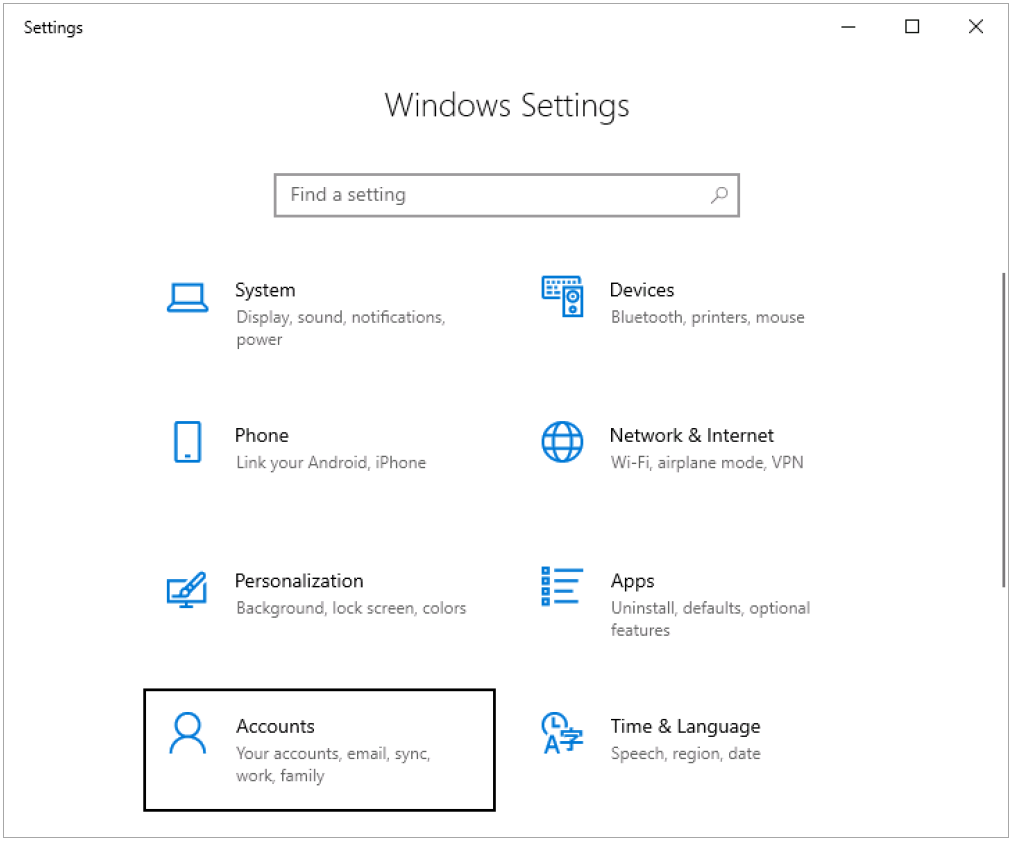
- Select Settings -> Accounts
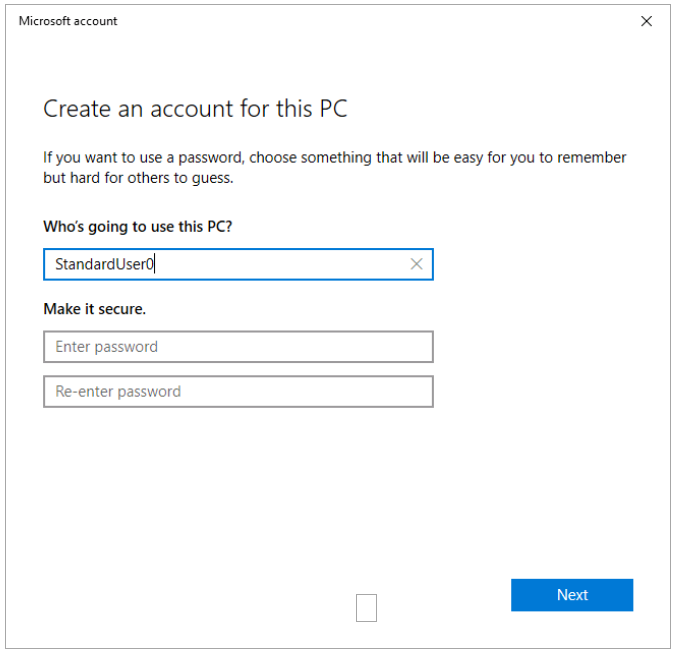
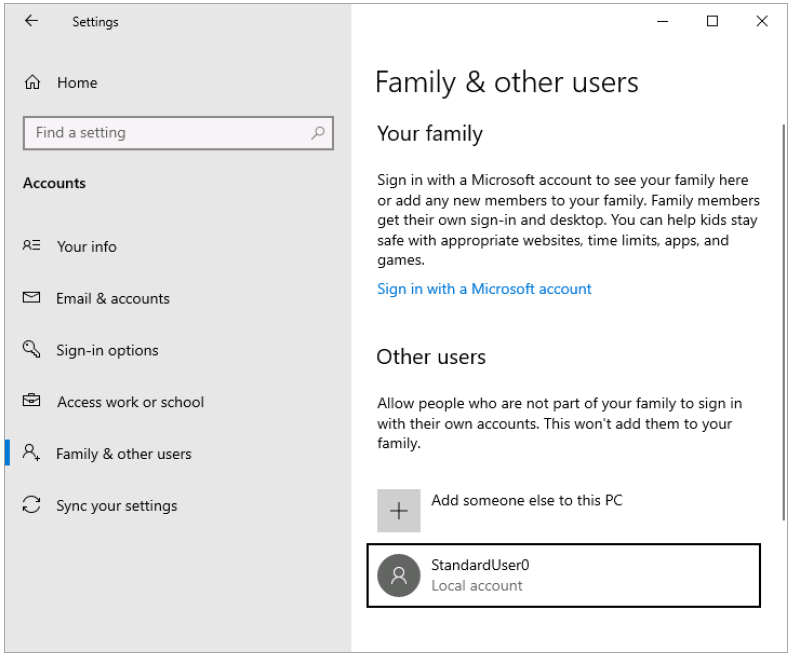
- Select Family & other users - Add someone else to this PC and set a username (“StandardUser0” here.) and a password.
- StandardUser0 has been created.
- Create a set of user environment file (%USERPROFILE%) by signing in with the created StandardUser0 account once.
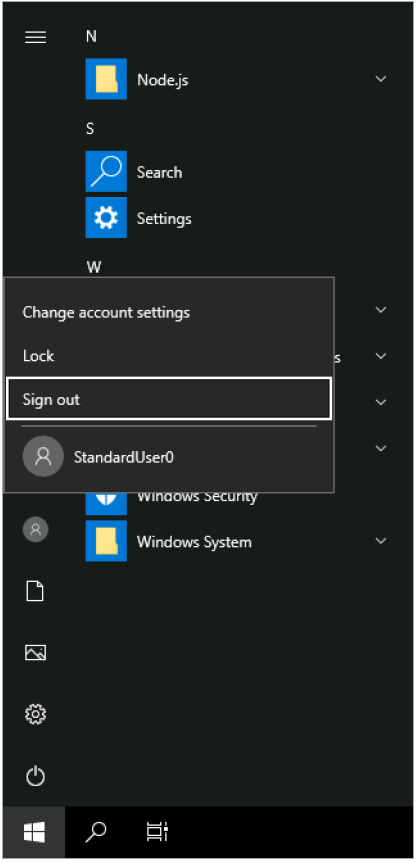
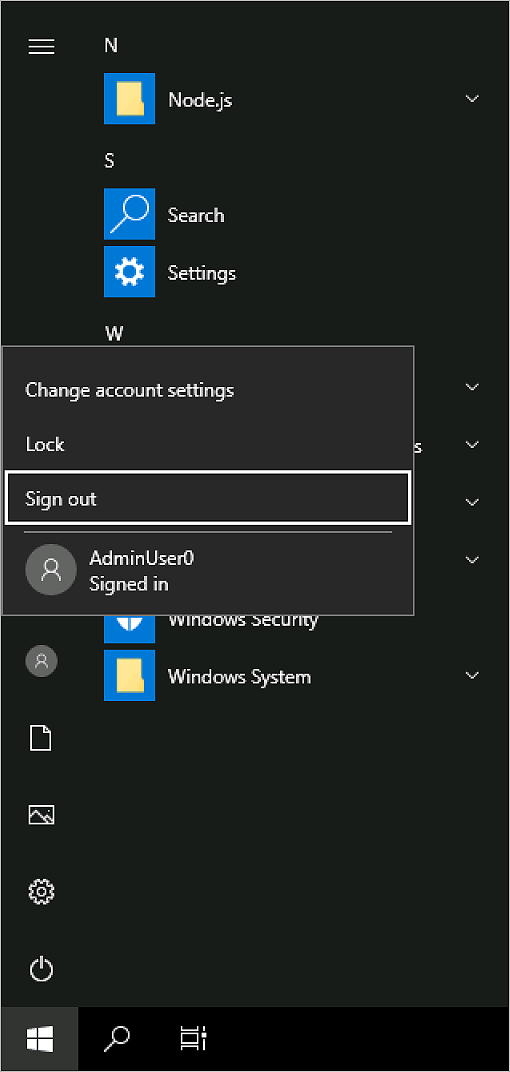
Click Start -> Sign out
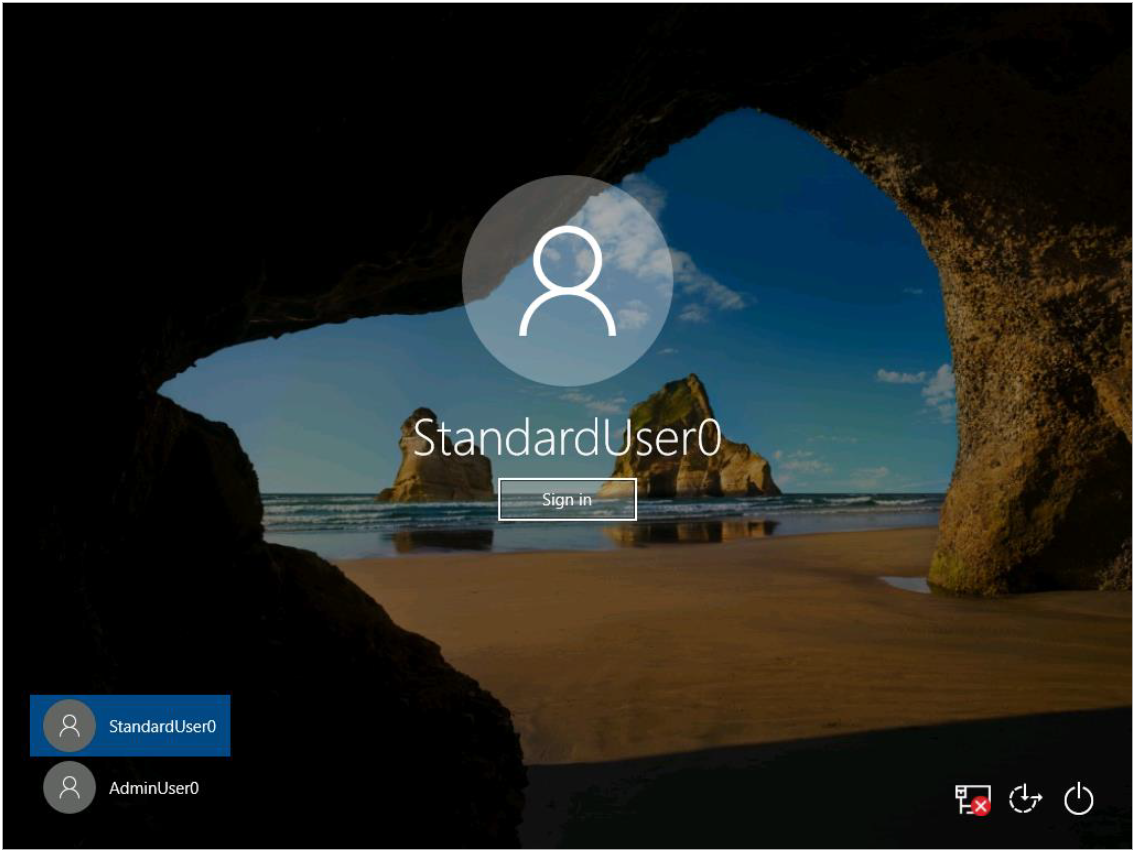
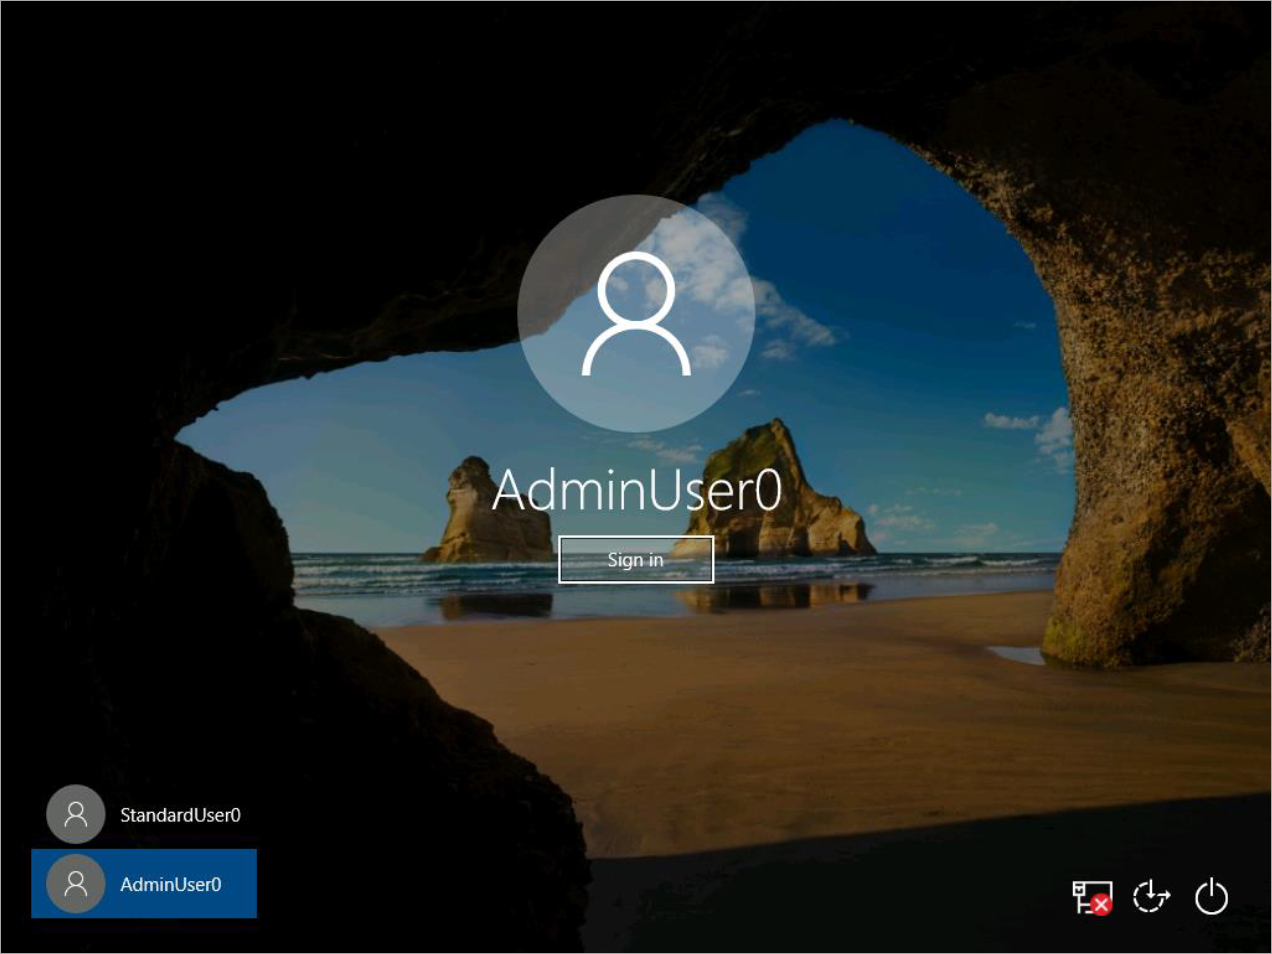
- Select the username on the Sign in screen and sign in.
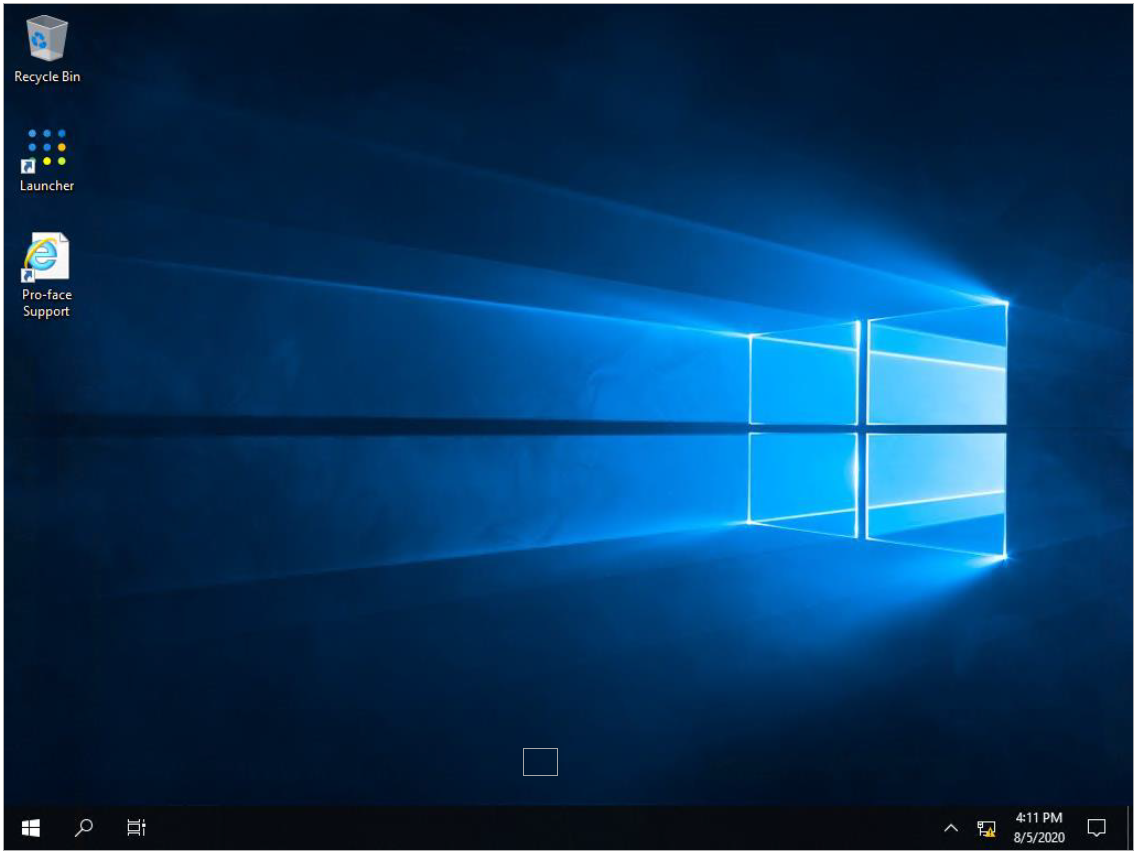
- The desktop is displayed. Double-click the Launcher icon.
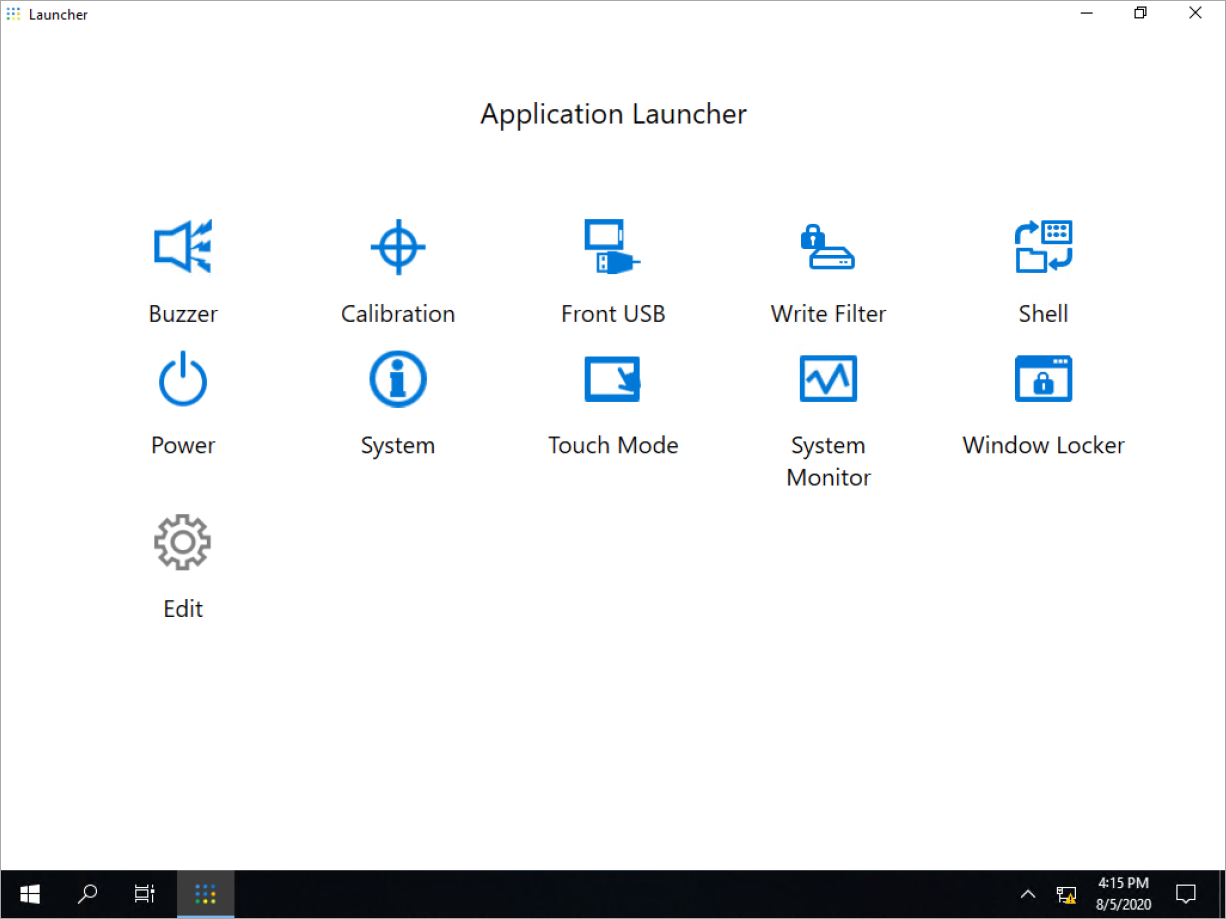
- Select System Monitor on the Launcher
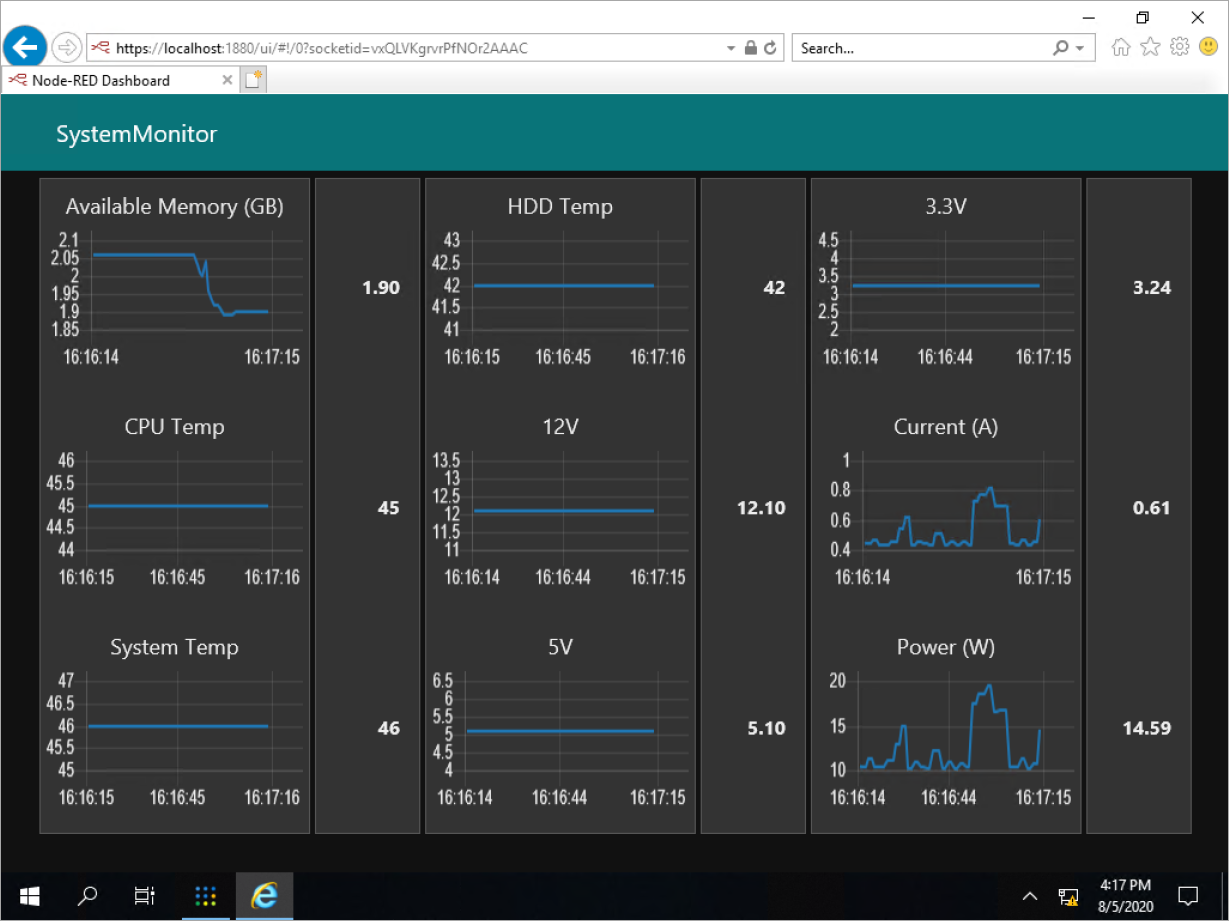
- Dashboard appears.
- Select Start -> Sign out
- Sign in with the original Administrator User account.
The new user account with a Standard User right is now created.
File Access Right Setting
- Using an Administrator User account, acquire an access right to edit files and folders created with Standard User accounts.
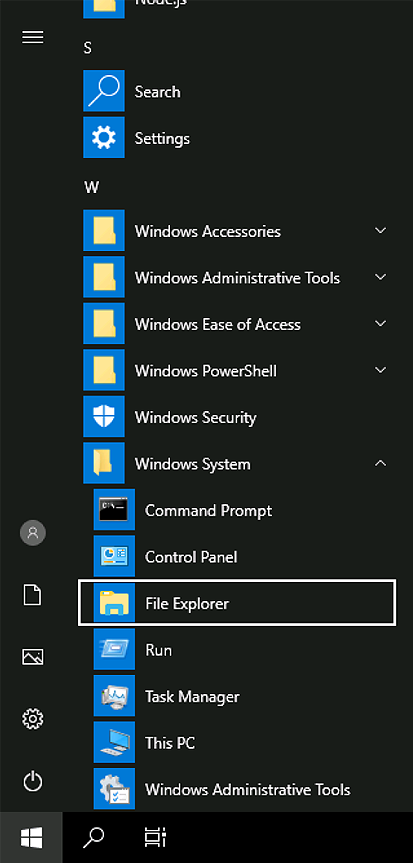
Open the File Explorer.
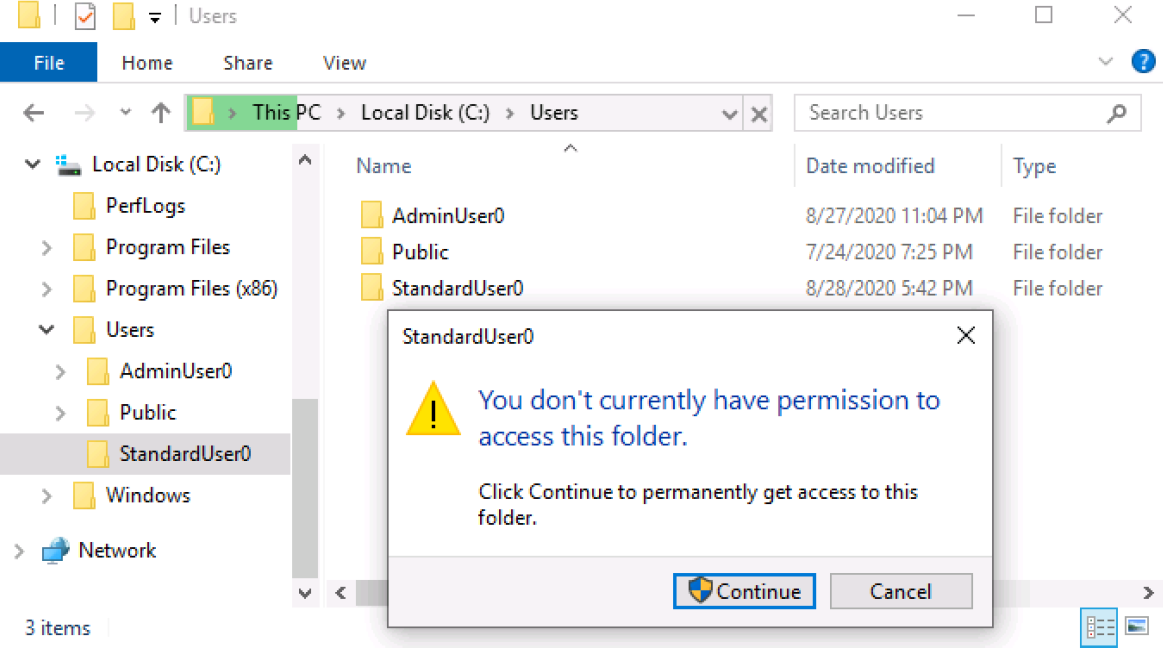
- Select the created Standard User folder under C:¥Users.
The confirmation dialog box for acquiring an access right appears. Select [Continue].
- Change the owner to the Administrators User group so that Standard Users cannot change the Node-RED environment.
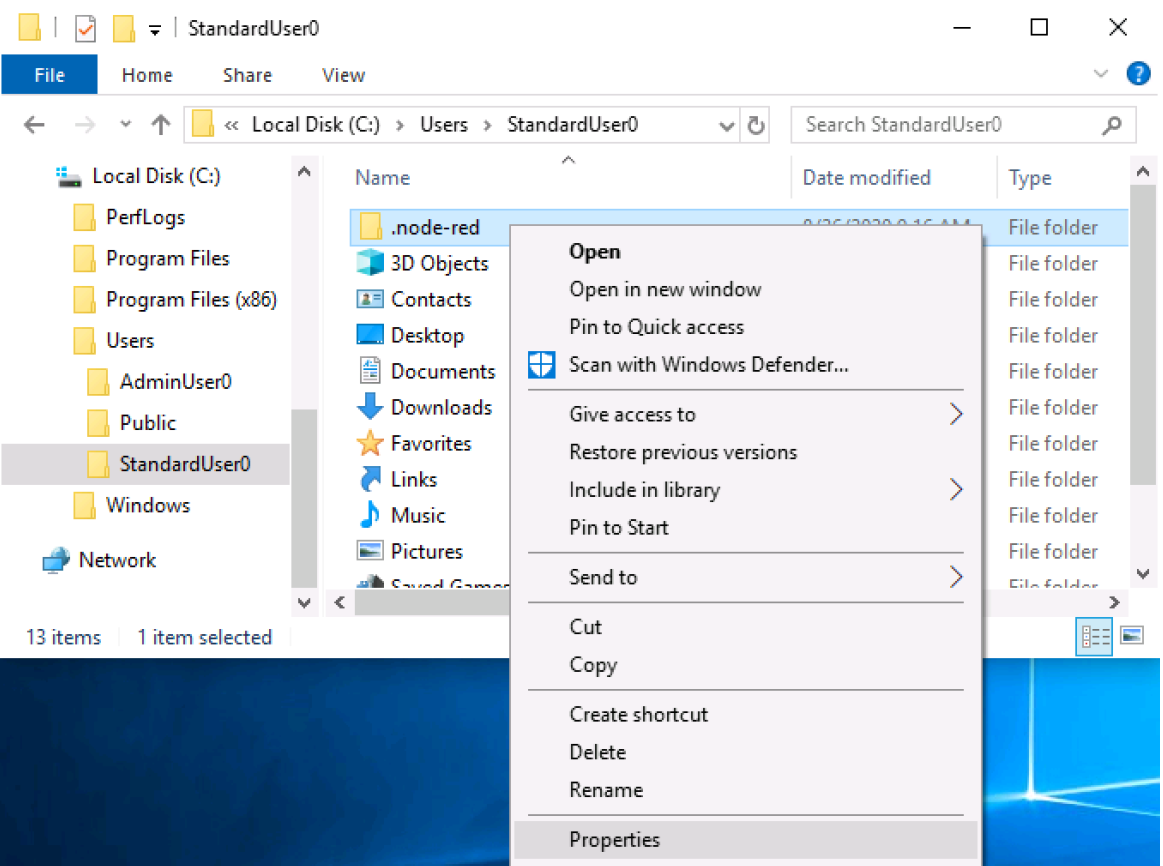
Right click on the node-red folder and select [Properties]. If the node-red folder does not exist here, it means that System Monitor is not started even once by this user. In this case go back to the step 4 of Create a Standard User account.
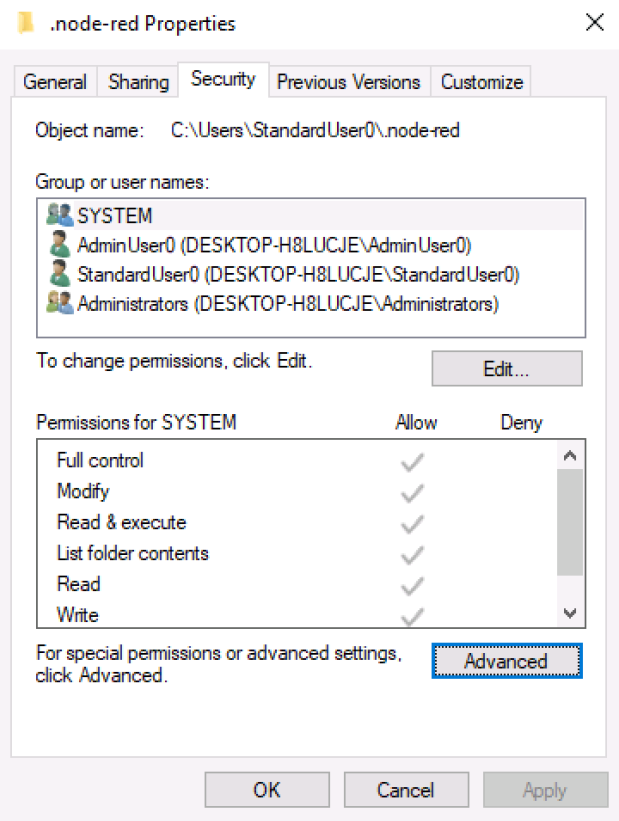
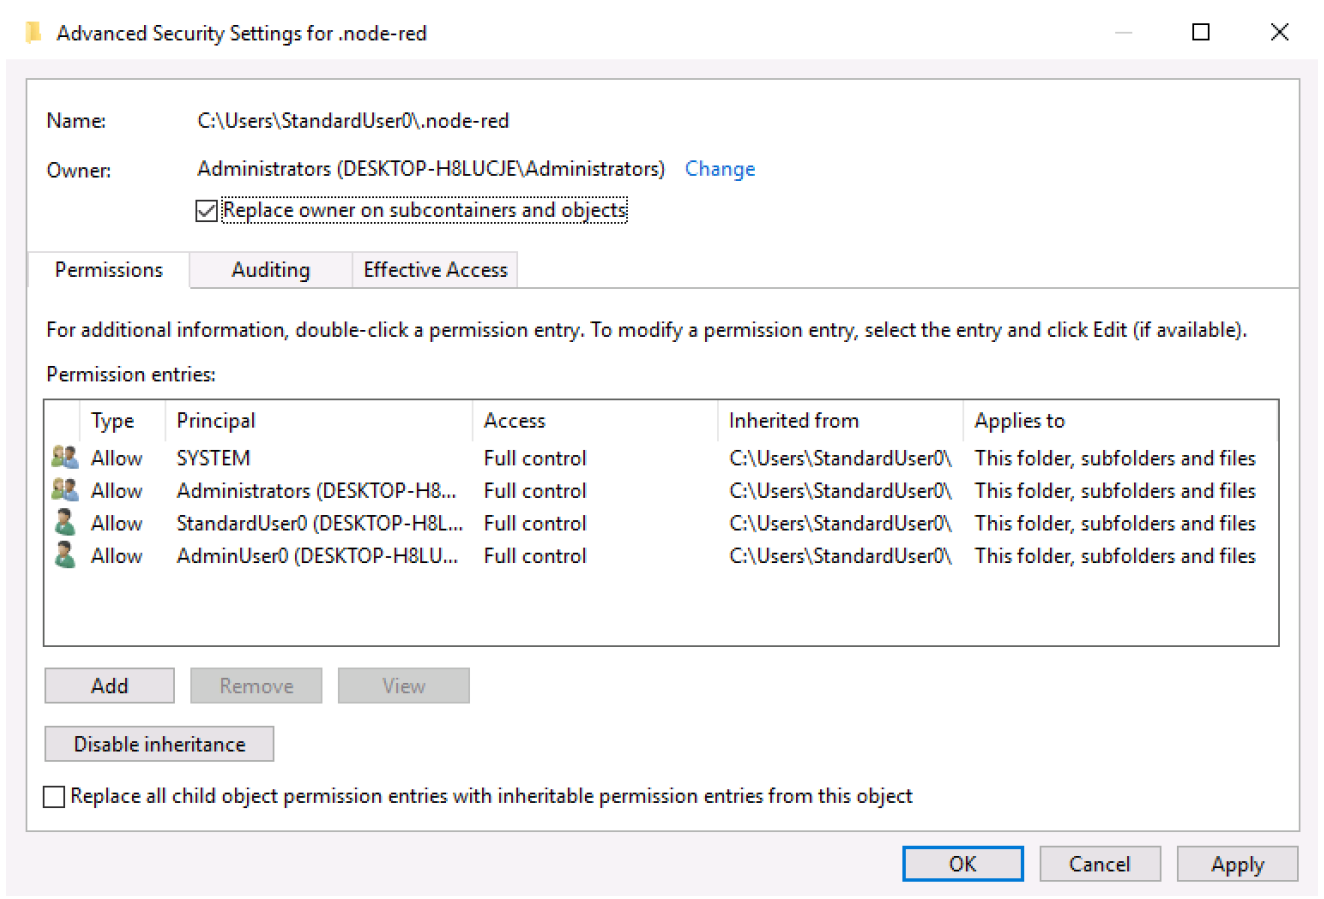
- Select Security -> Advanced
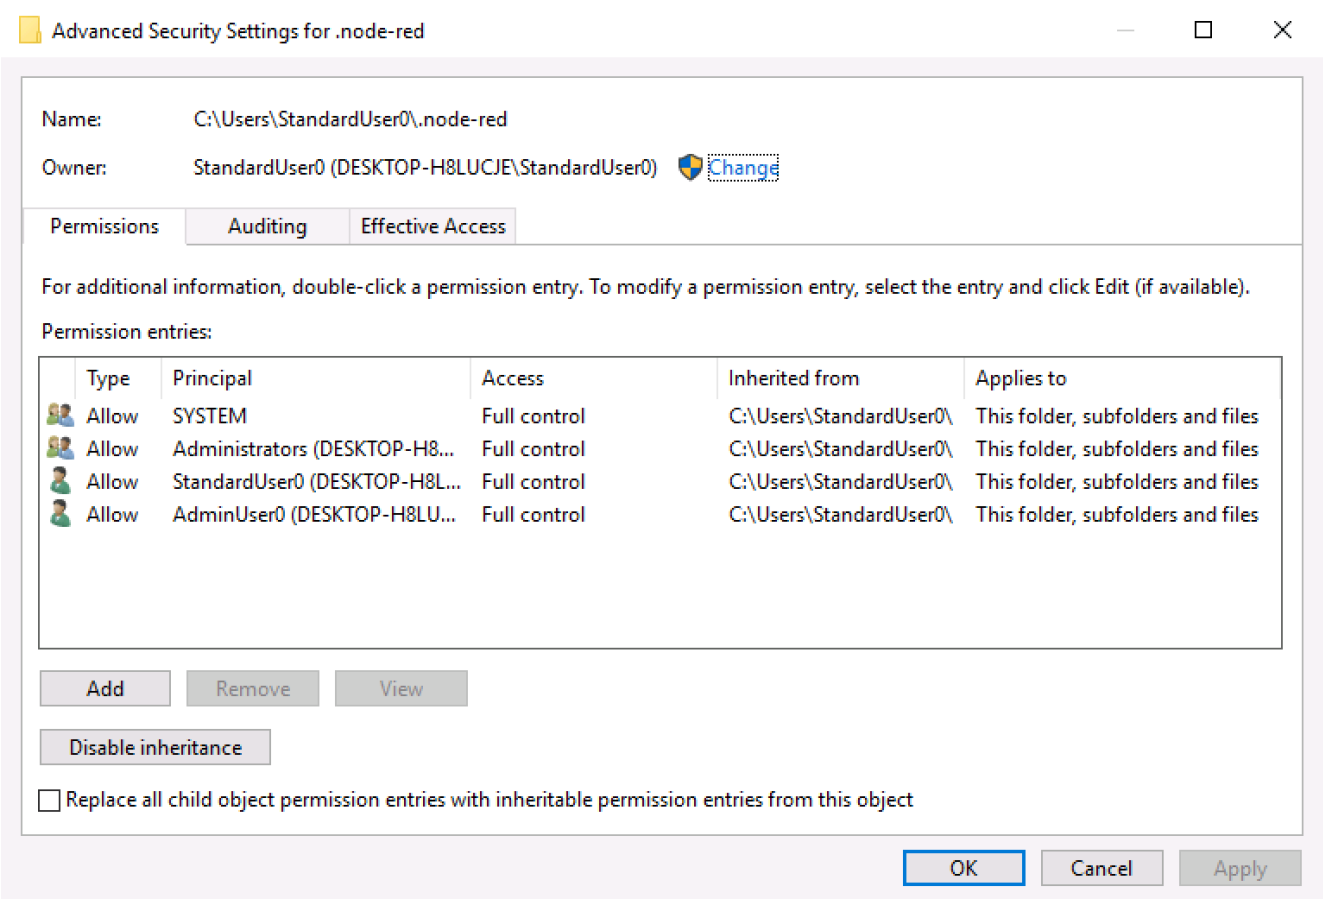
- Select [Change] next to [Owner] to change the right of ownership.
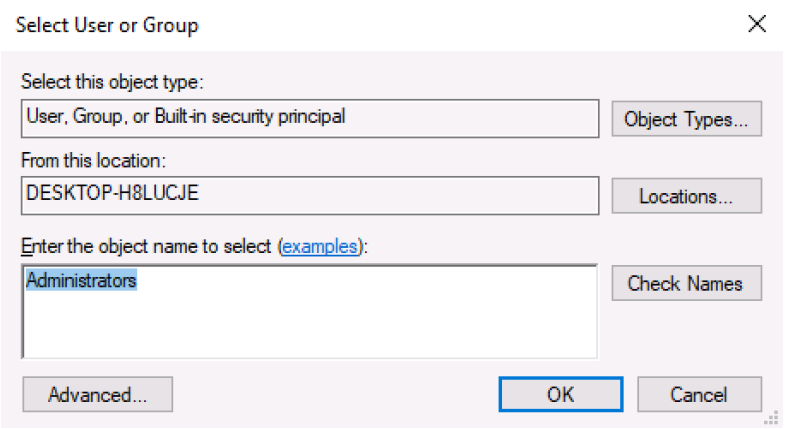
- Enter “Administrators” in [Enter the object name to select] and select [OK]. The owner is changed to the Administrators User group.
- Check the box of [Replace owner on subcontainers and objects].
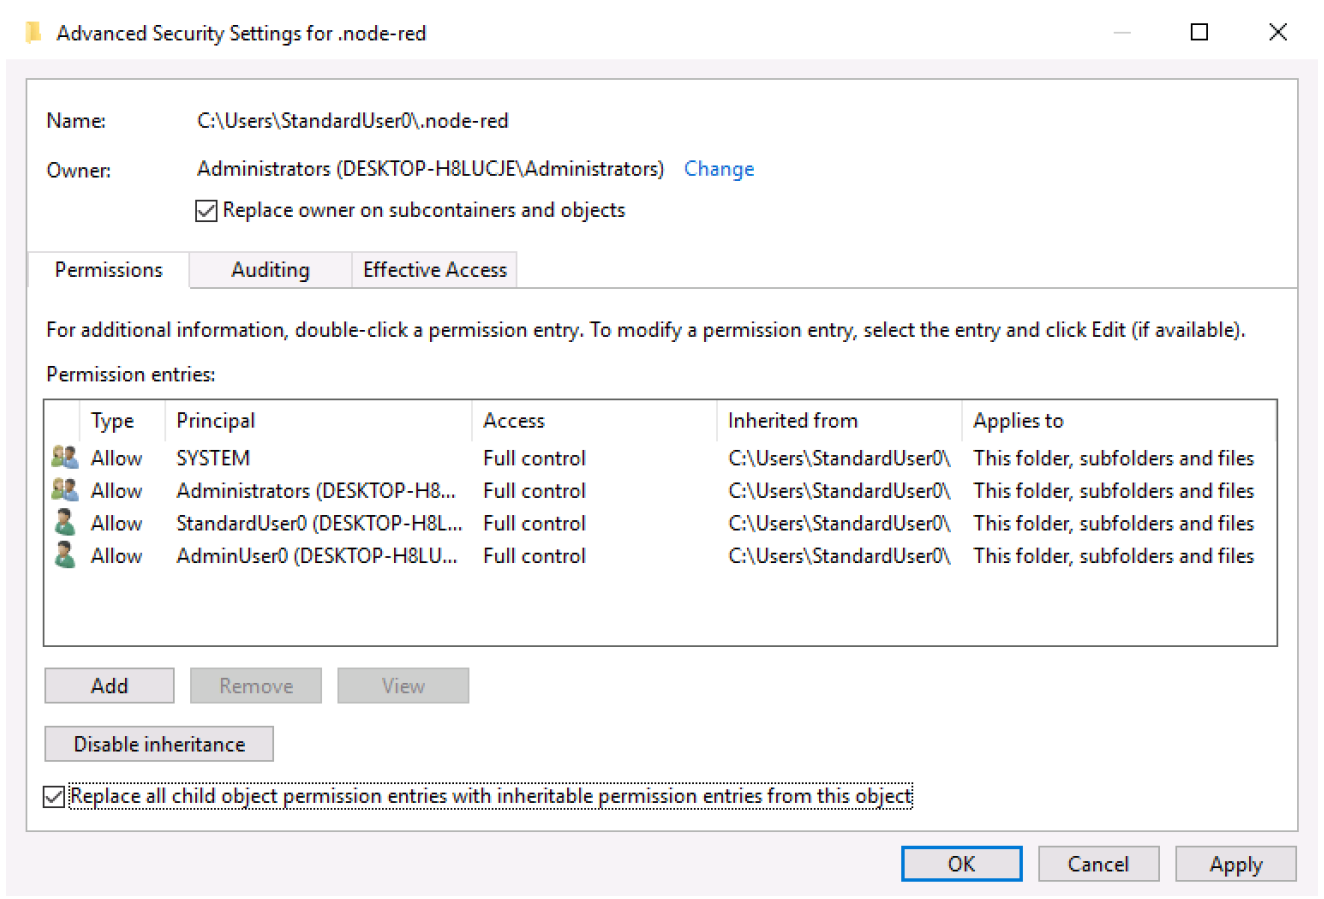
- Check the box of [Replace child object permission entries with inheritable permission entries from this object].
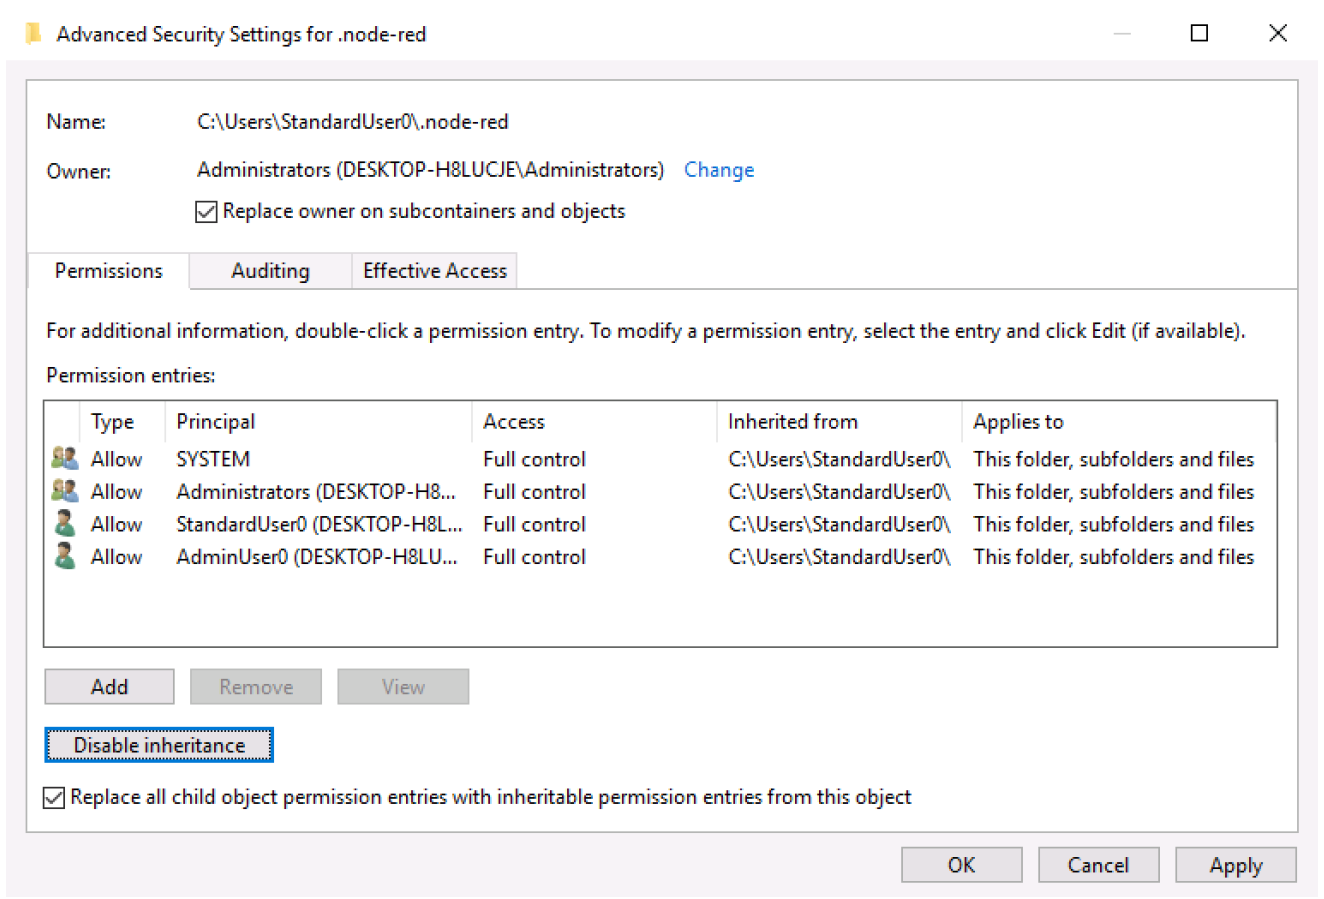
- Select [Disable inheritance].
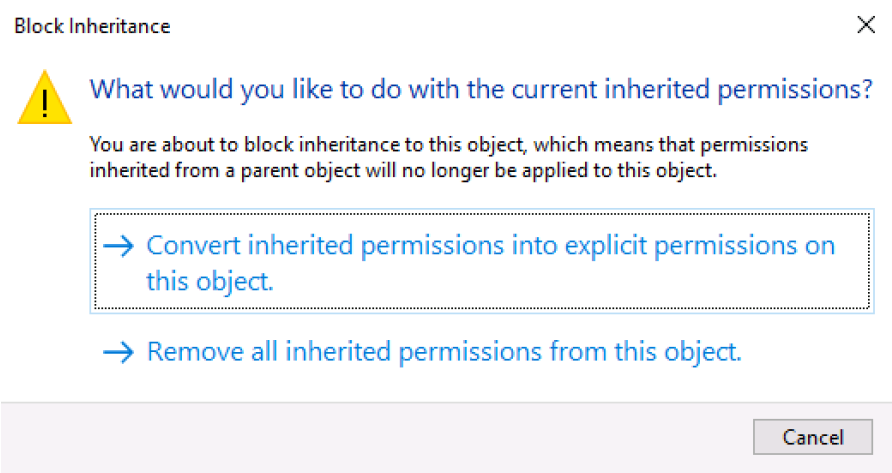
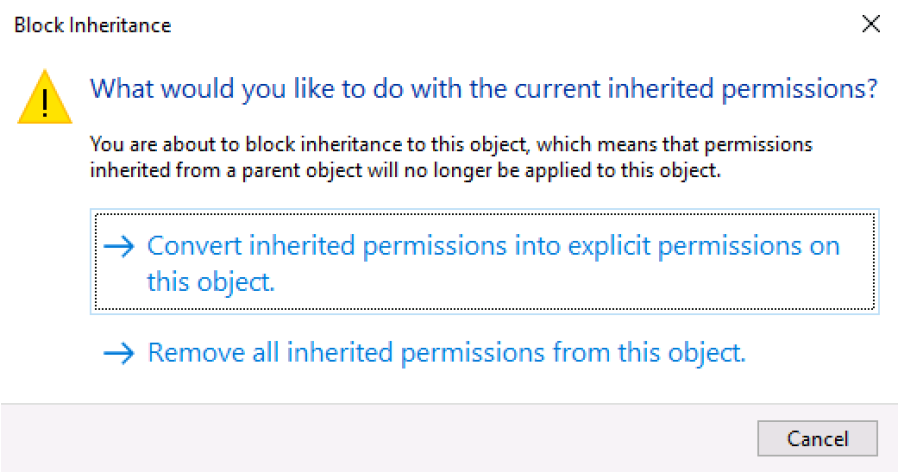
- A dialog box appears to ask what you would like to do with the inherited access right. Select [Convert inherited permissions into explicit permissions on this object.].
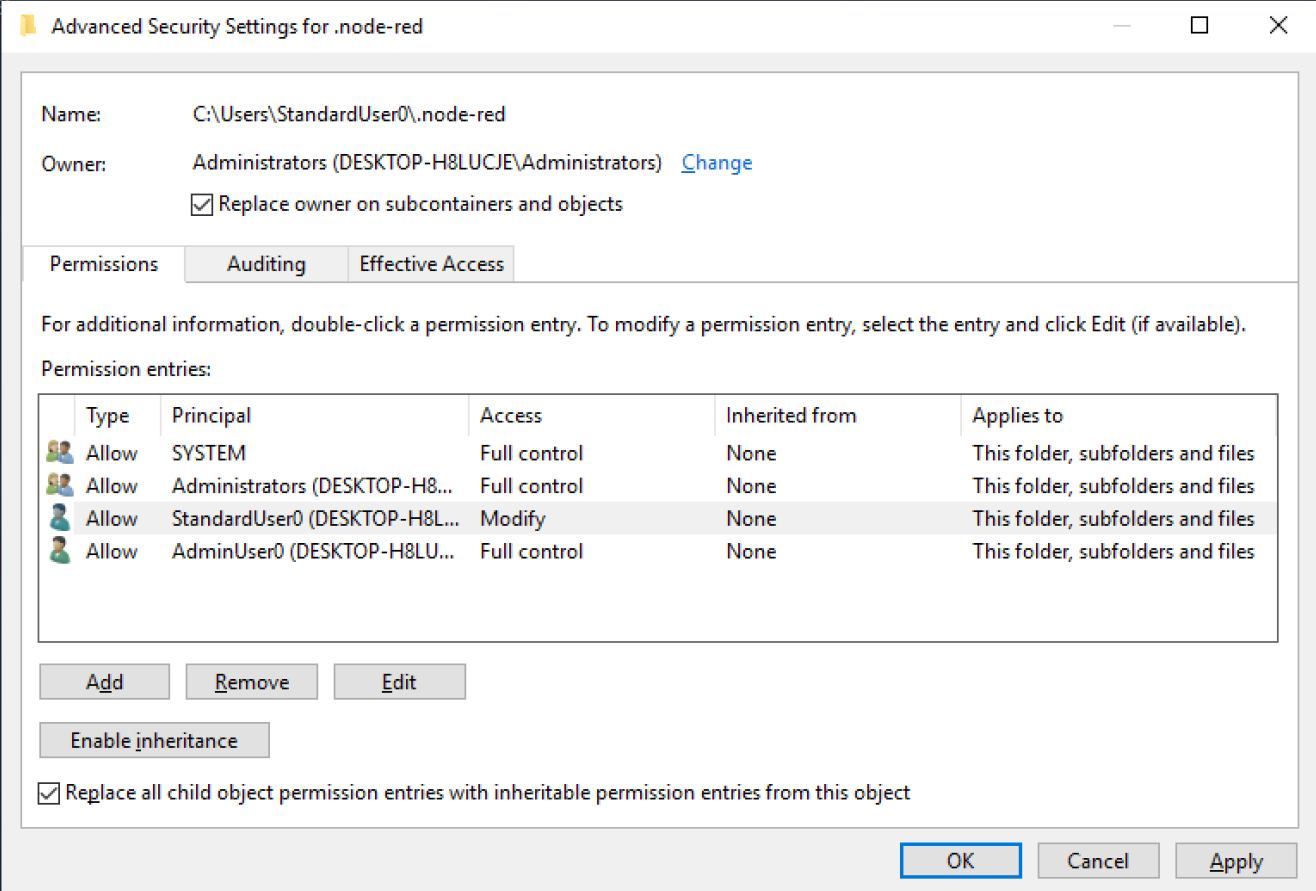
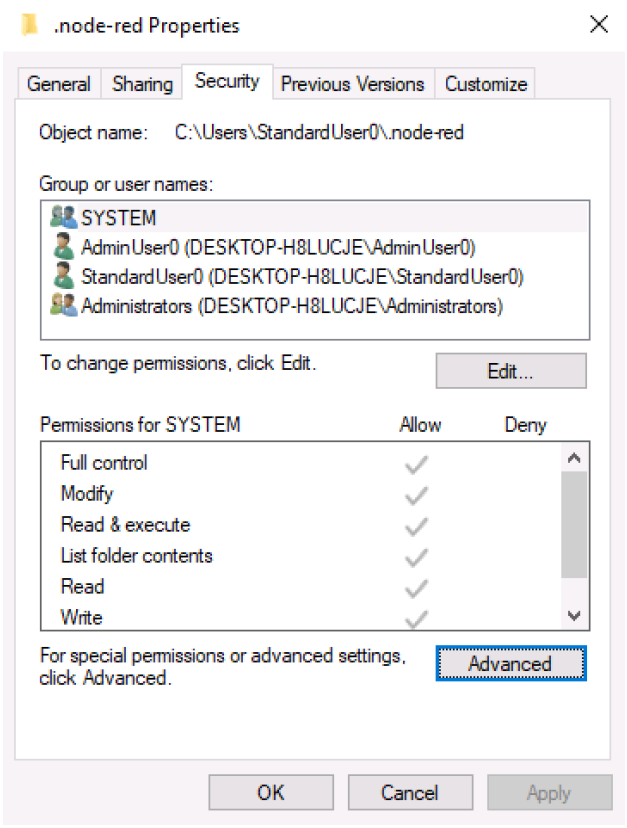
- Delete only the Full control permission because the .node-red folder needs the Write permission when executing Node-RED.
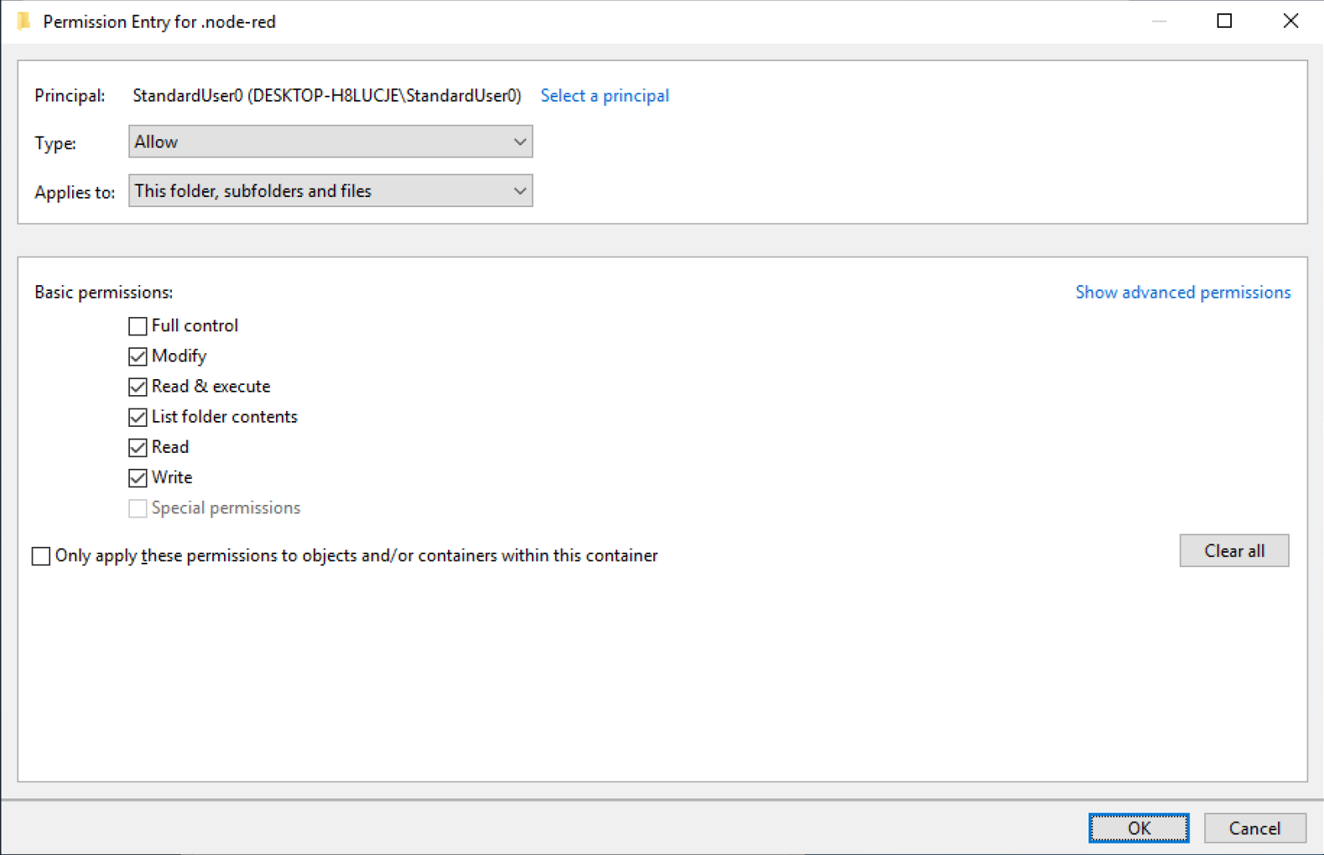
Select the Standard User to use - StandardUser0 – and then select [Edit].
- Uncheck [Full control] in [Basic permissions] and select [OK].
- Confirm that the access right of the Standard User is changed to [Modify] and select [OK].
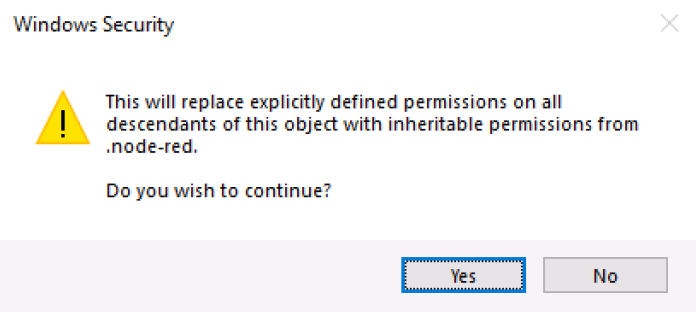
- A confirmation dialog box for replacing the access right appears. Select [Yes].
- [Select [OK].
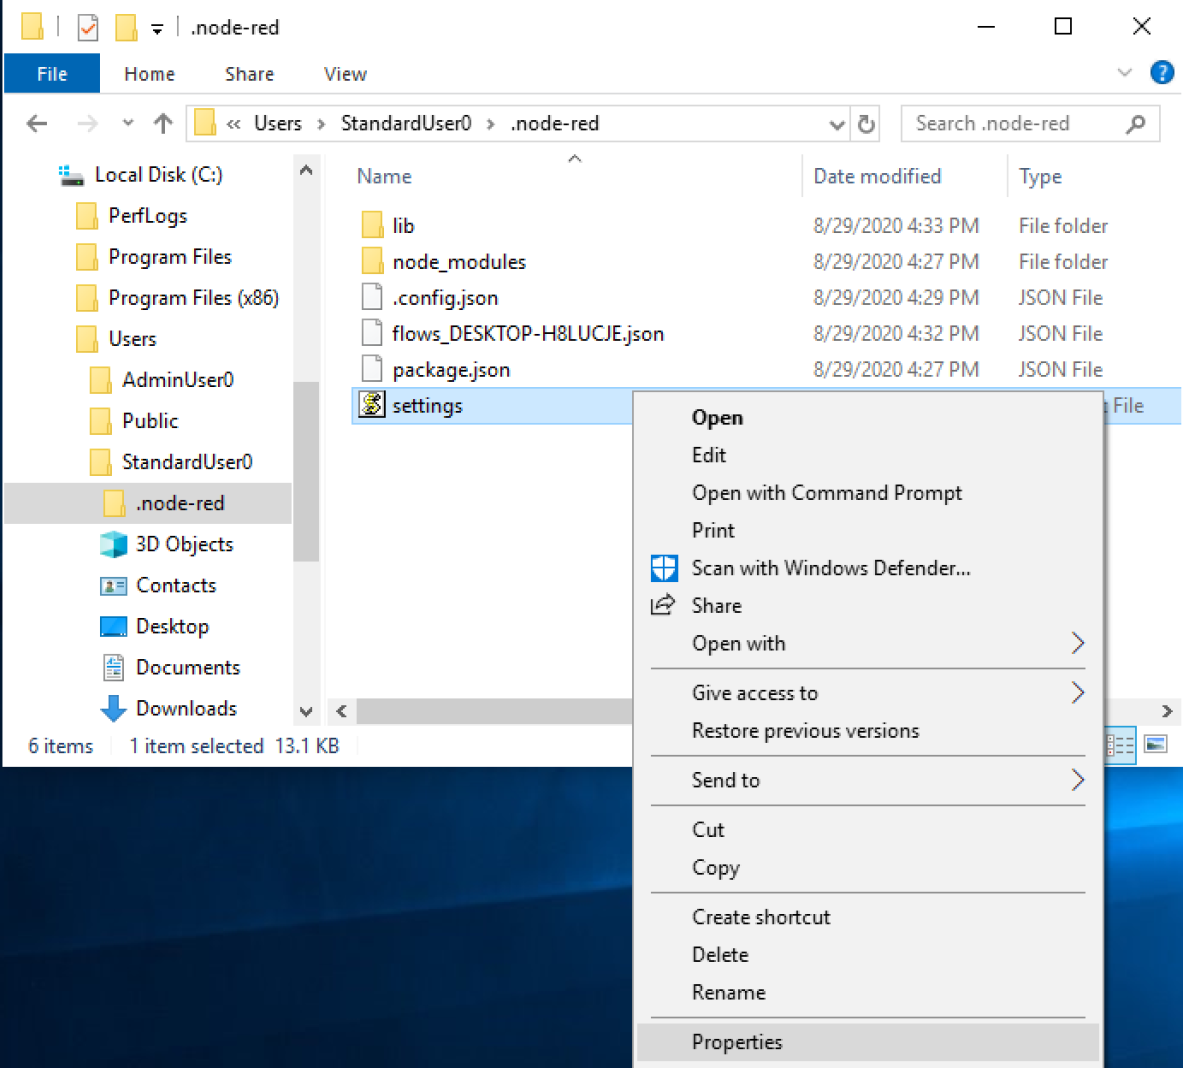
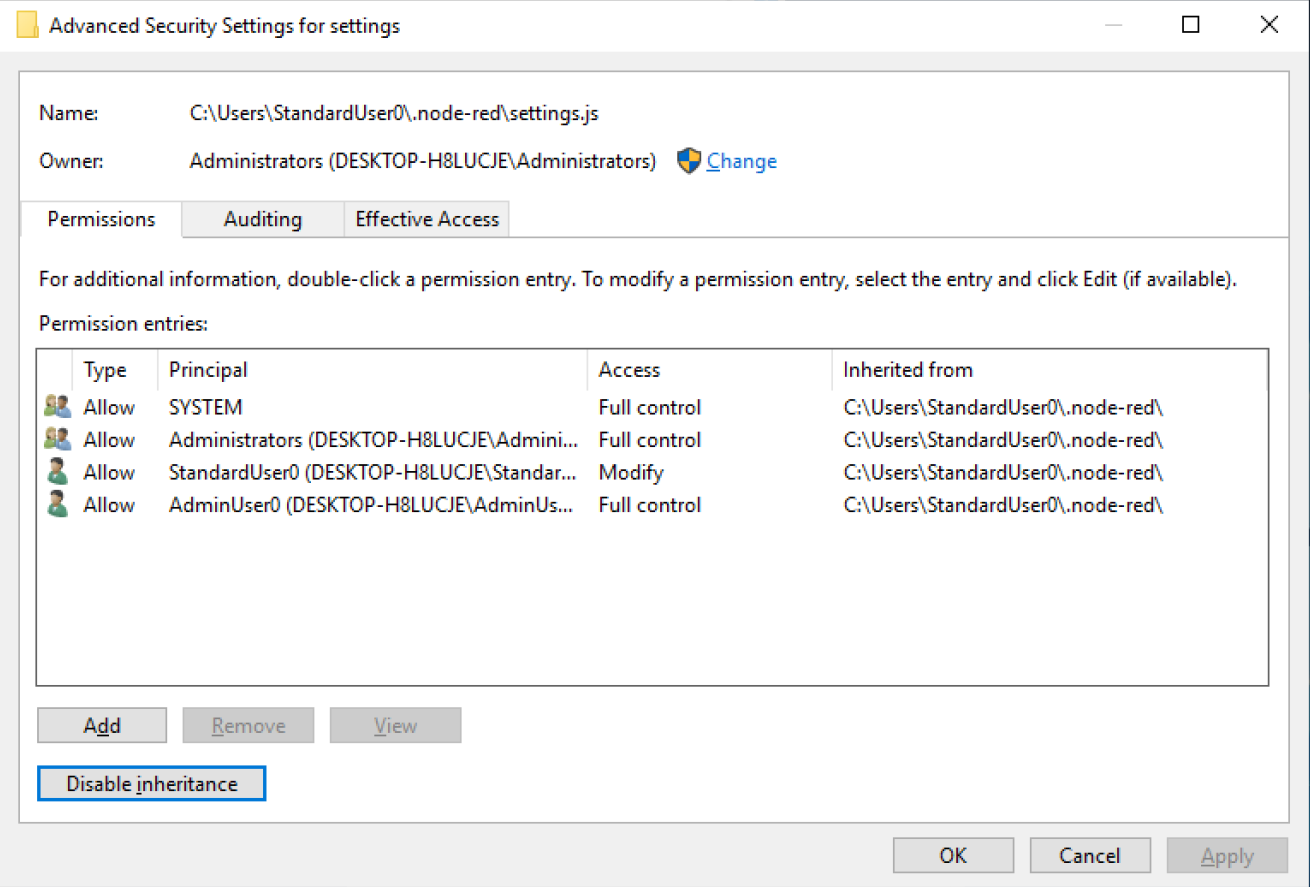
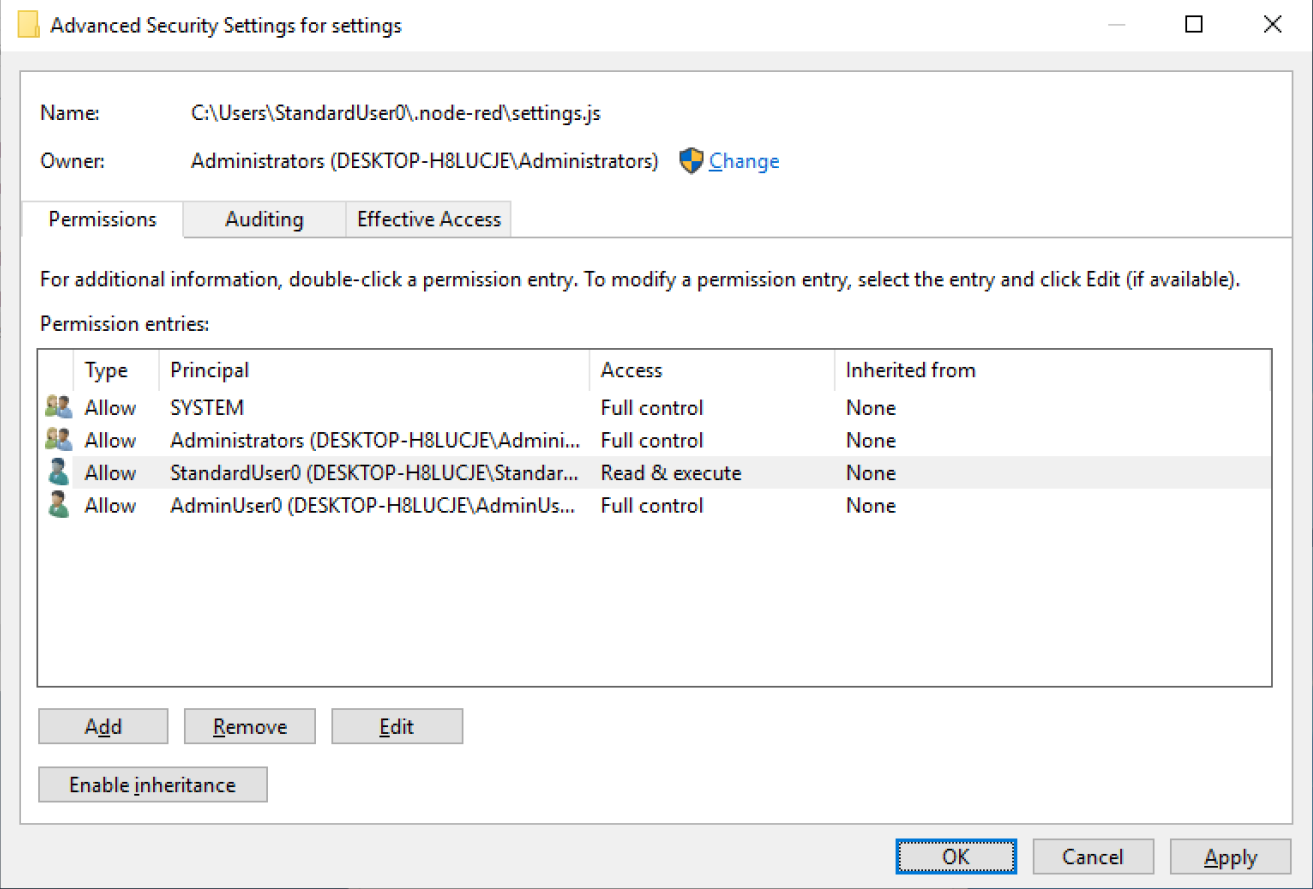
- Configure detailed settings of the files in the .node-red folder. As “settings.js” includes important setting information, edit must be prohibited.
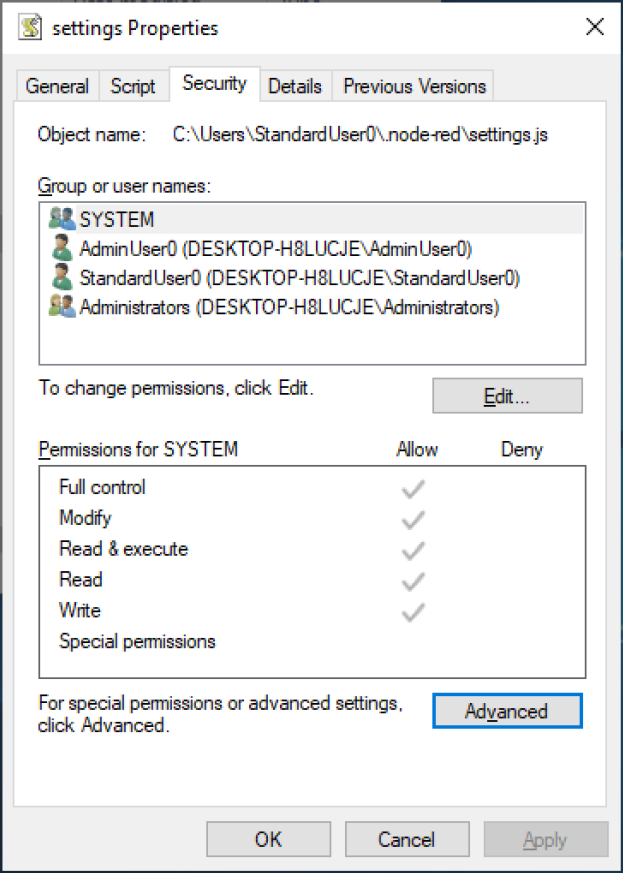
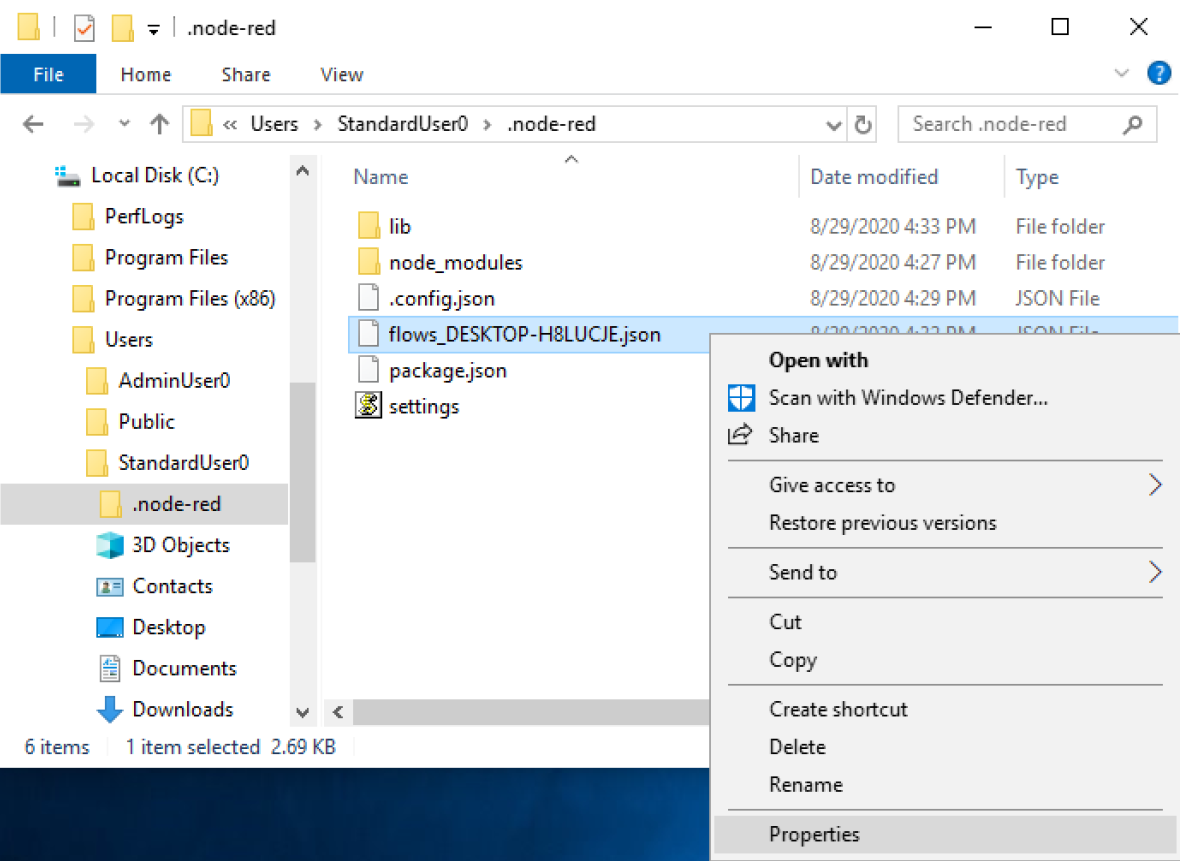
Right click on “settings.js” and open [Properties].
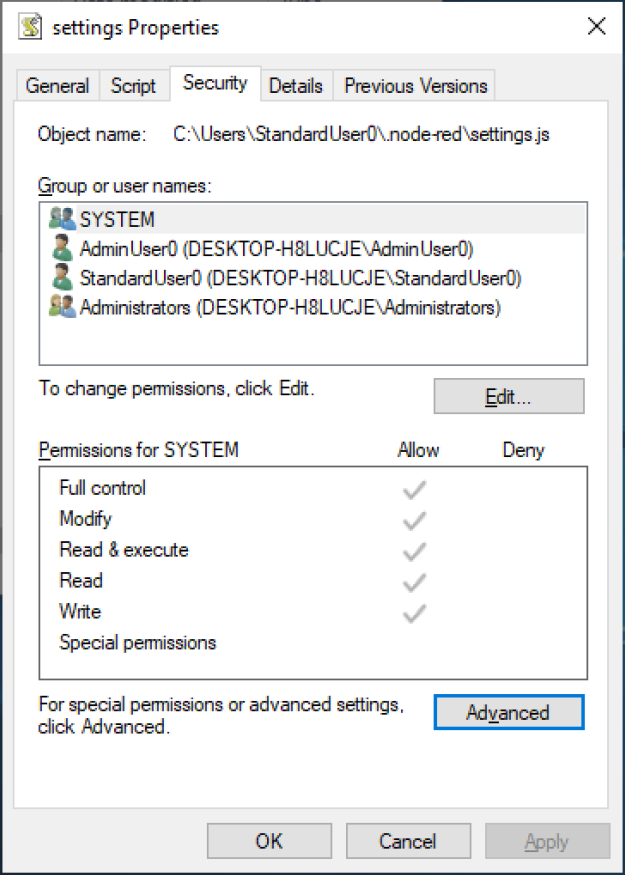
- Select Security -> Advanced
- Select [Disable inheritance].
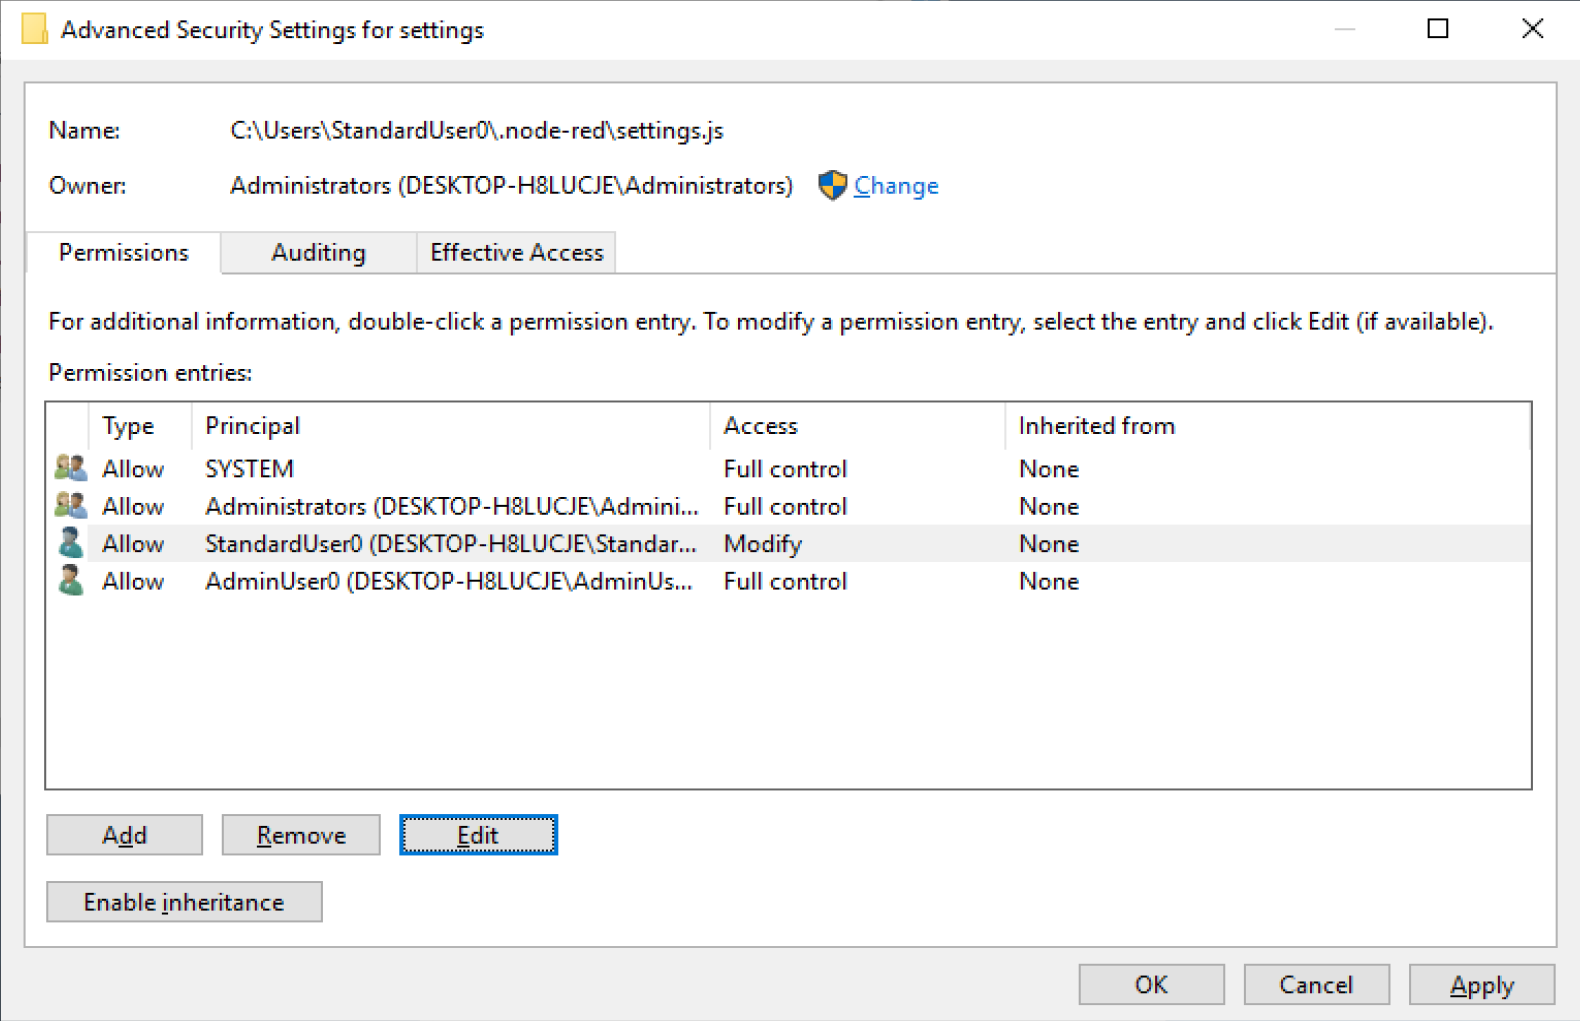
- A dialog box appears to ask what you would like to do with the inherited access right. Select [Convert inherited permissions into explicit permissions on this object.].
- Select the Standard User to be used - StandardUser0 – and then select [Edit].
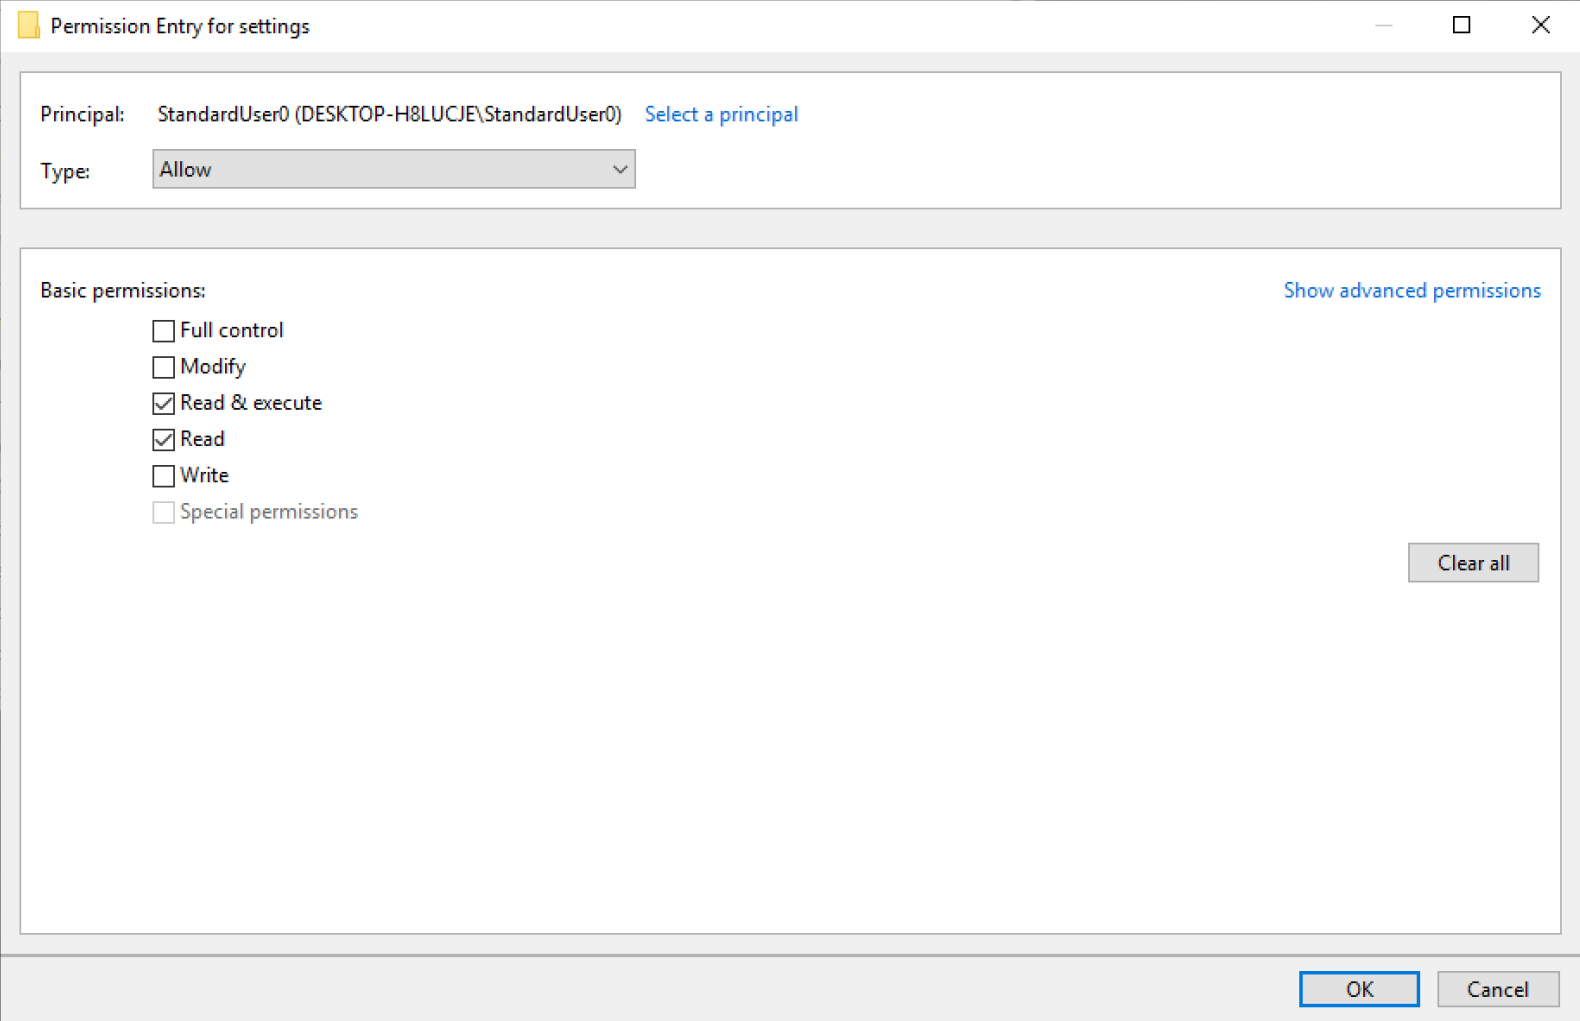
- Uncheck [Full control], [Modify], and [Write] in [Basic Permissions].
- Confirm that the access right of the Standard User is changed to [Read & execute] and select [OK].
- Select [OK].
- Prohibit edit of the flow file in the .node-red folder.
Open [Properties] of the flow file in the .node-red folder and change the access right of the Standard User to [Read & execute] in the same way as the step 17 to 23.
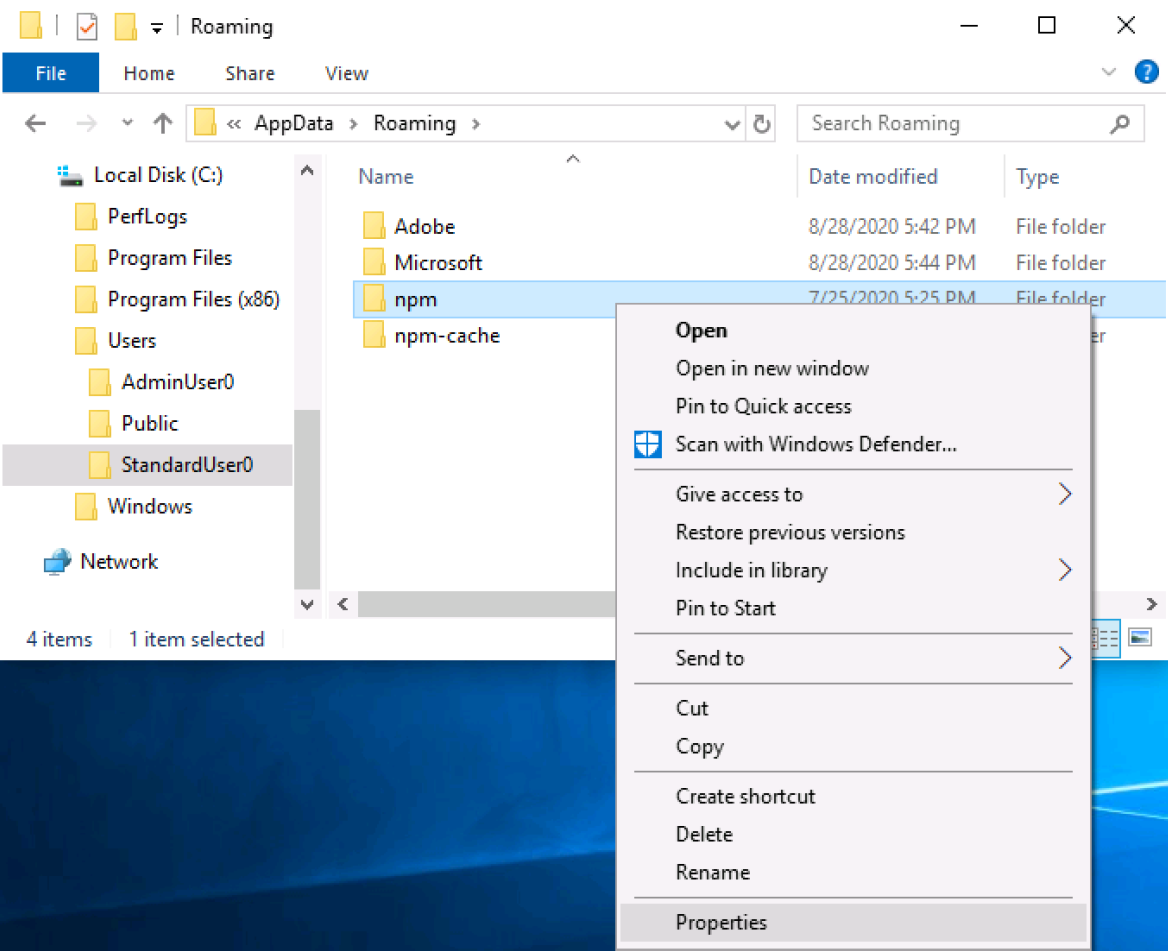
- Change the access right to read only to protect the global-installed node.
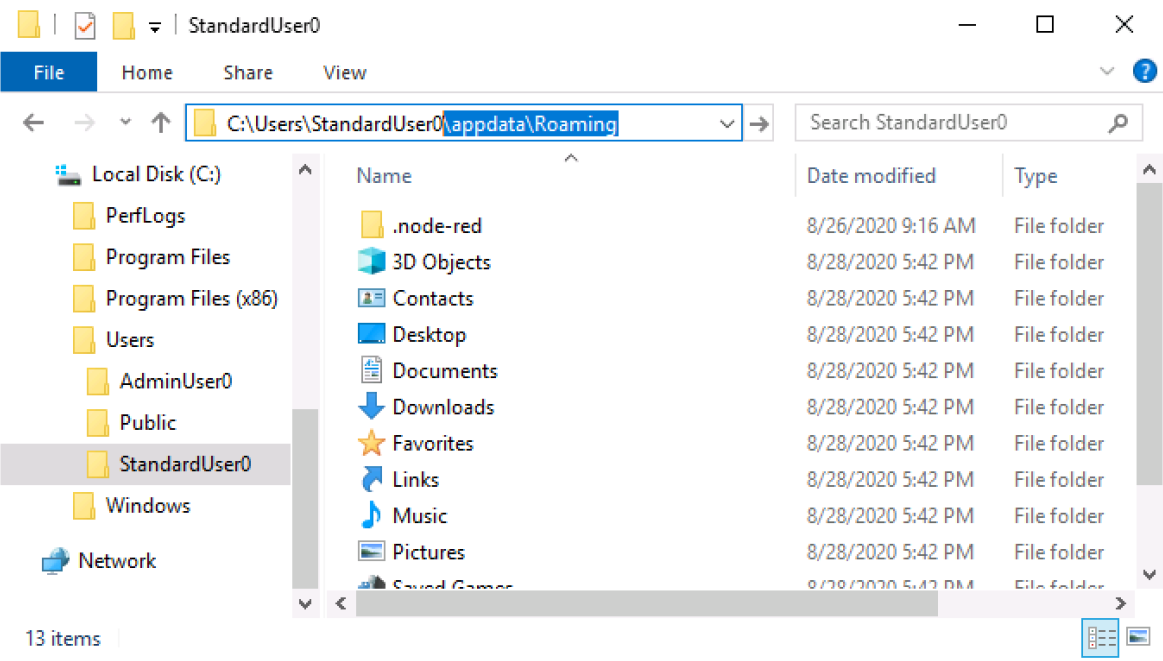
Open the User folder and enter ¥AppData¥Roaming after the folder name to open the hidden folder.
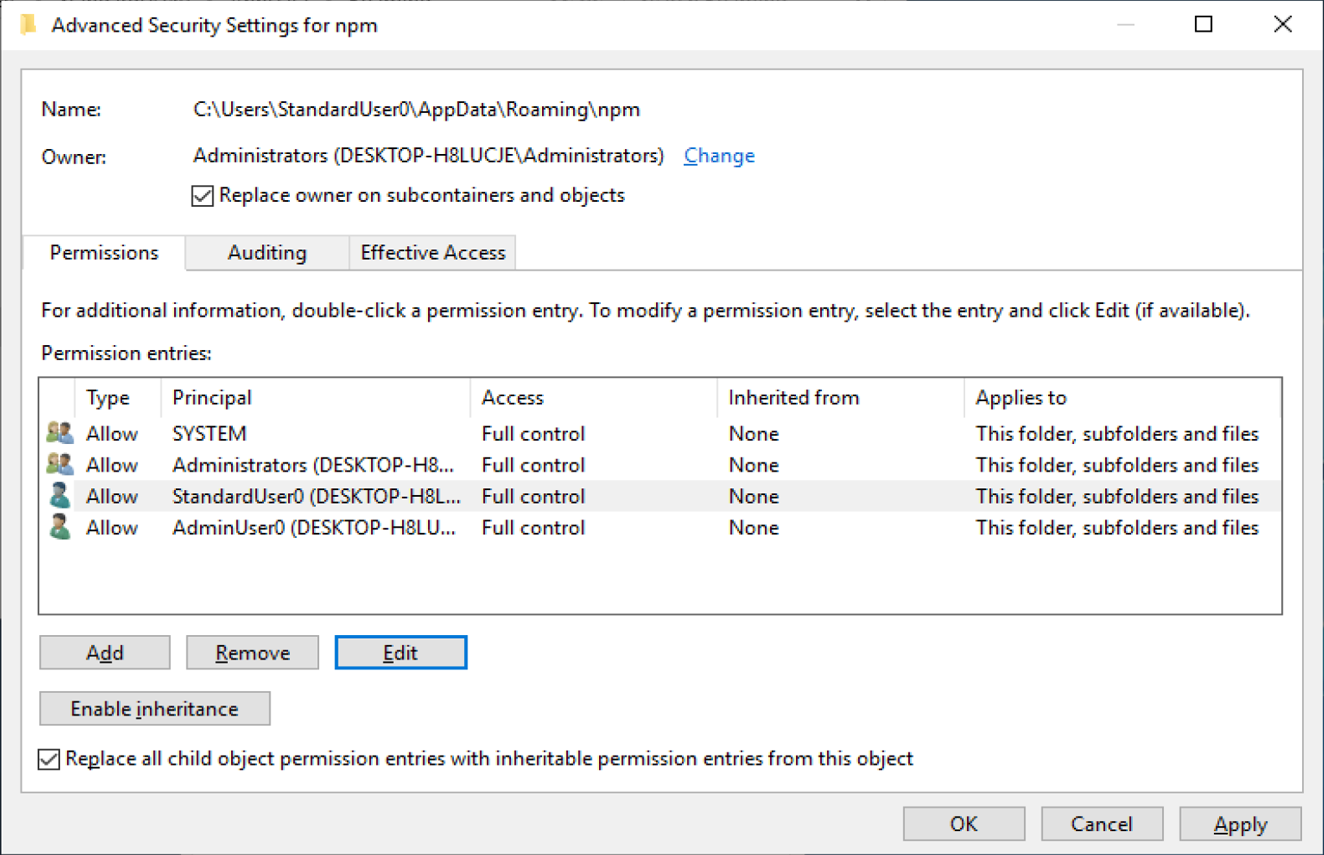
- Open [Properties] of ¥AppData¥Roaming¥npm.
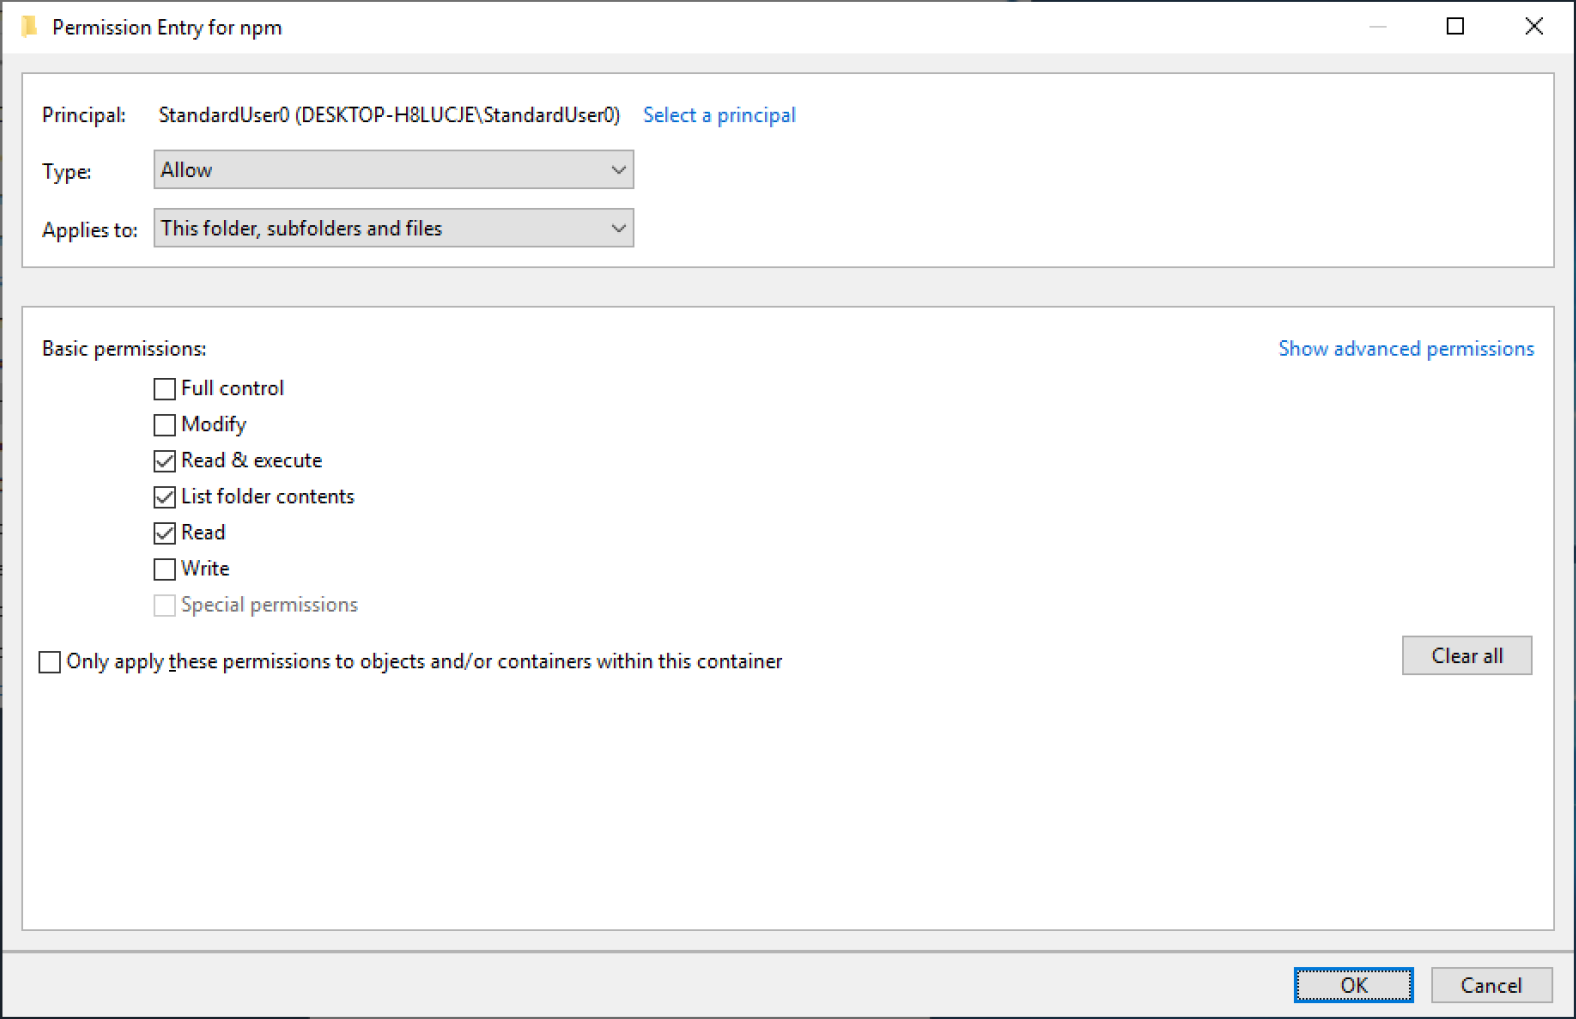
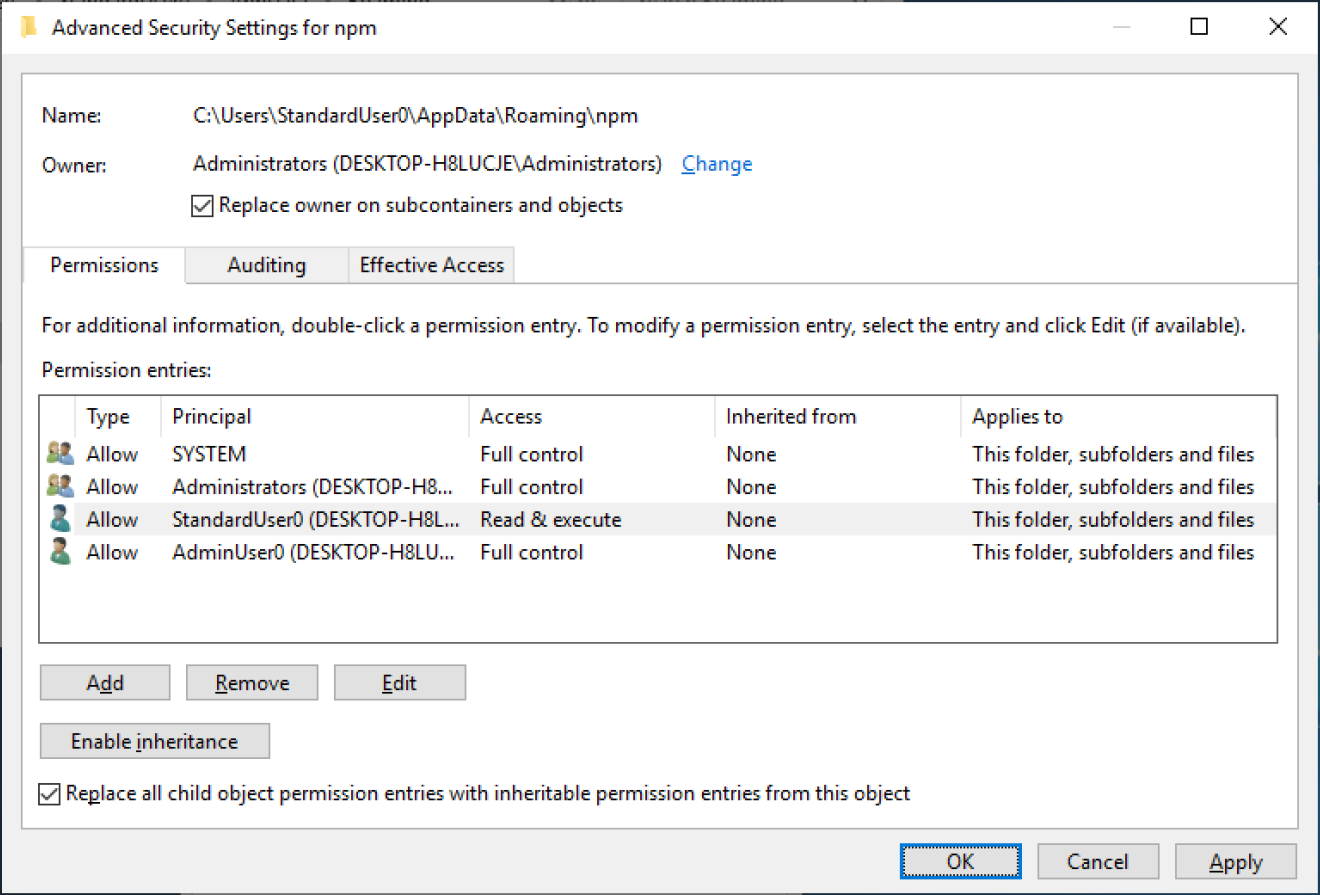
- Uncheck [Full control], [Modify], and [Write] in the same way as the step 4 to 11.
- Confirm that the access right of the Standard User is changed to [Read & execute] and select [OK]. Then follow the step 14 to 15.
The access right of the created Standard User account to access the files related with node-red is now changed.
System Monitor
What is System Monitor?
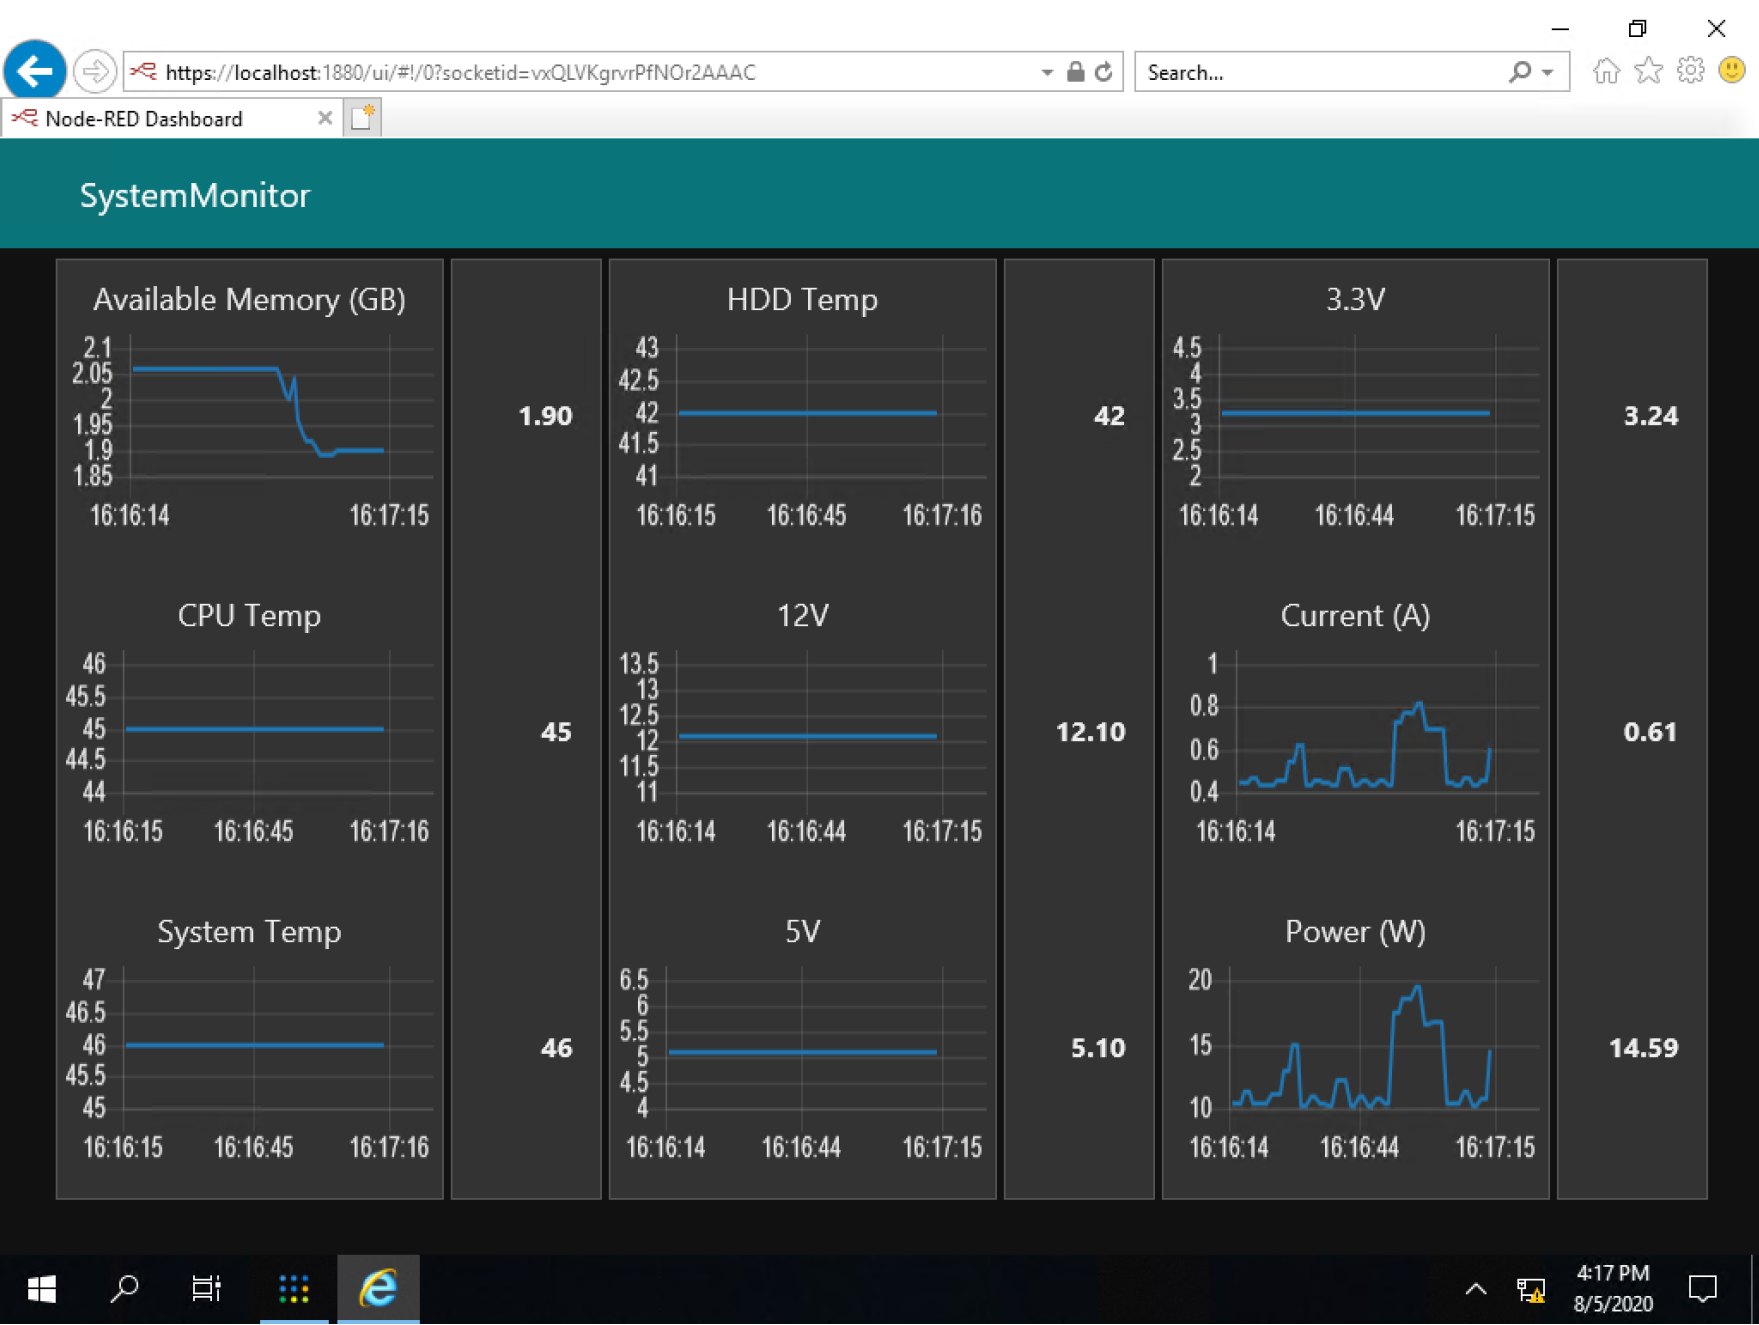
- System Monitor enables you to monitor sensor values of this product, such as temperature, voltage, power consumption and so on, with the feature of node-red-dashboard.
- Dedicated Node for acquiring sensor values of this product, such as temperature, voltage, power consumption and so on, is provided for Node-RED.
- System Monitor is provided as an editable sample UI screen using node-red-dashboard.
- You can apply System Monitor as a part of an IIoT system by creating your own flow, for example, using it for remote monitoring of the system installed at a remote place with Pro-face Connect or VPN combined.
Note : On Firefox, System Monitor's graphs cannot be drawn properly. Use Internet Explorer, Chrome or Edge to draw graphs.
System Monitor error action
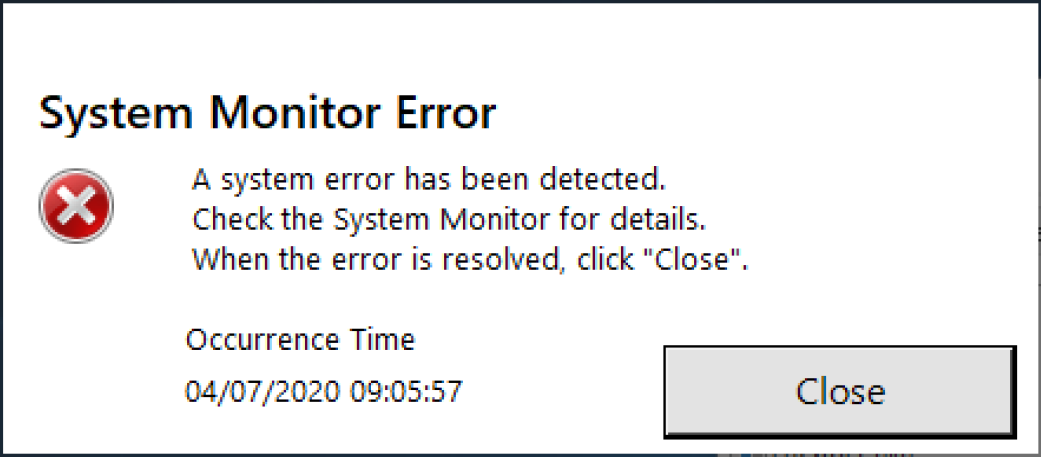
System Monitor takes the following actions when an error is detected.
- Display error message
- Output Event Log
TYPE Event ID Description Error 2 SysMonSrv : xxxxxx exceeded the threshold. (vvvvvv) Information 1 SysMonSrv : xxxxxx has returned to the normal range. xxxxxx : Sensor name (e.g. CPU Temp)
vvvvvv : Sensor values of detected error. - Change of Front LED status (Orange/Red Alternating)
How to open System Monitor
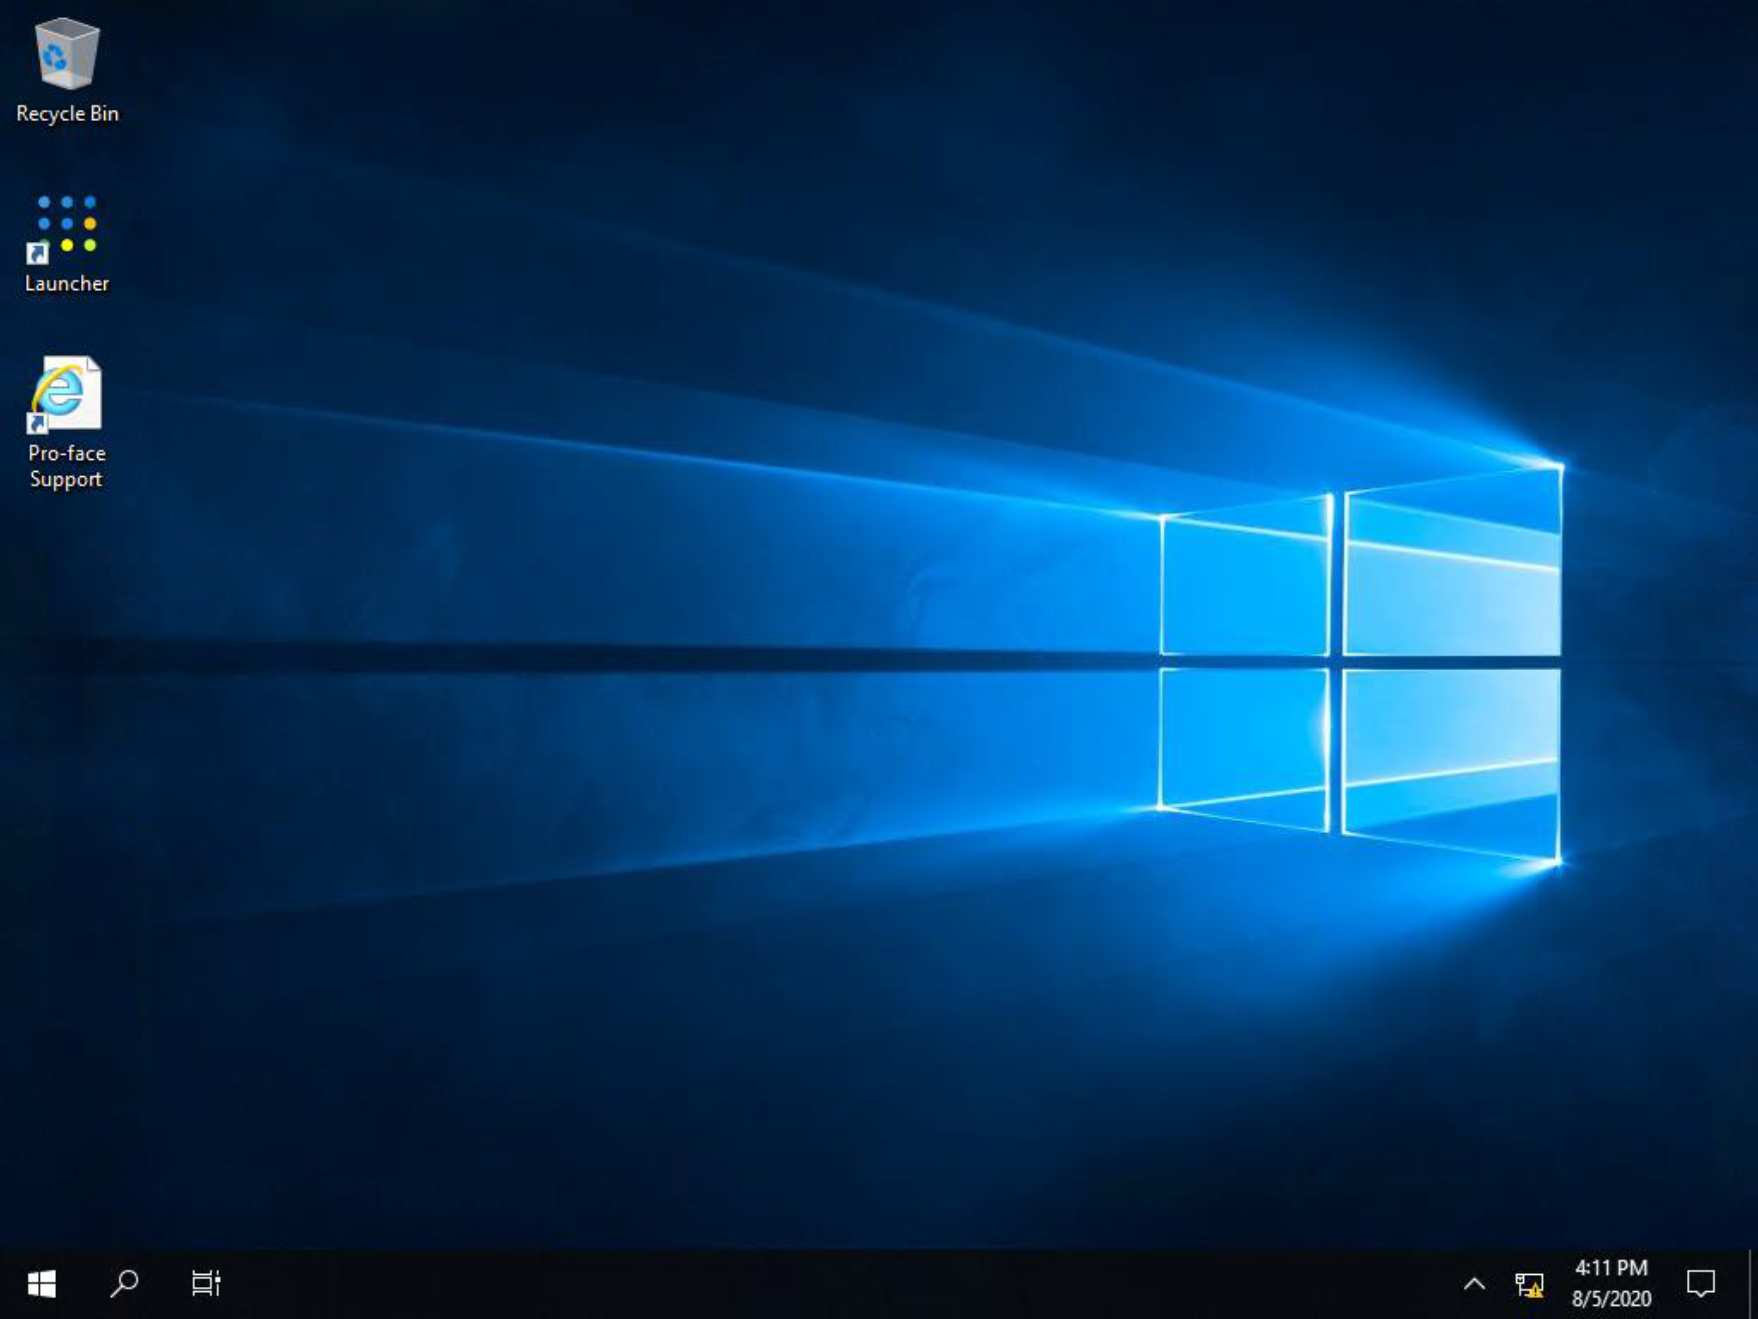
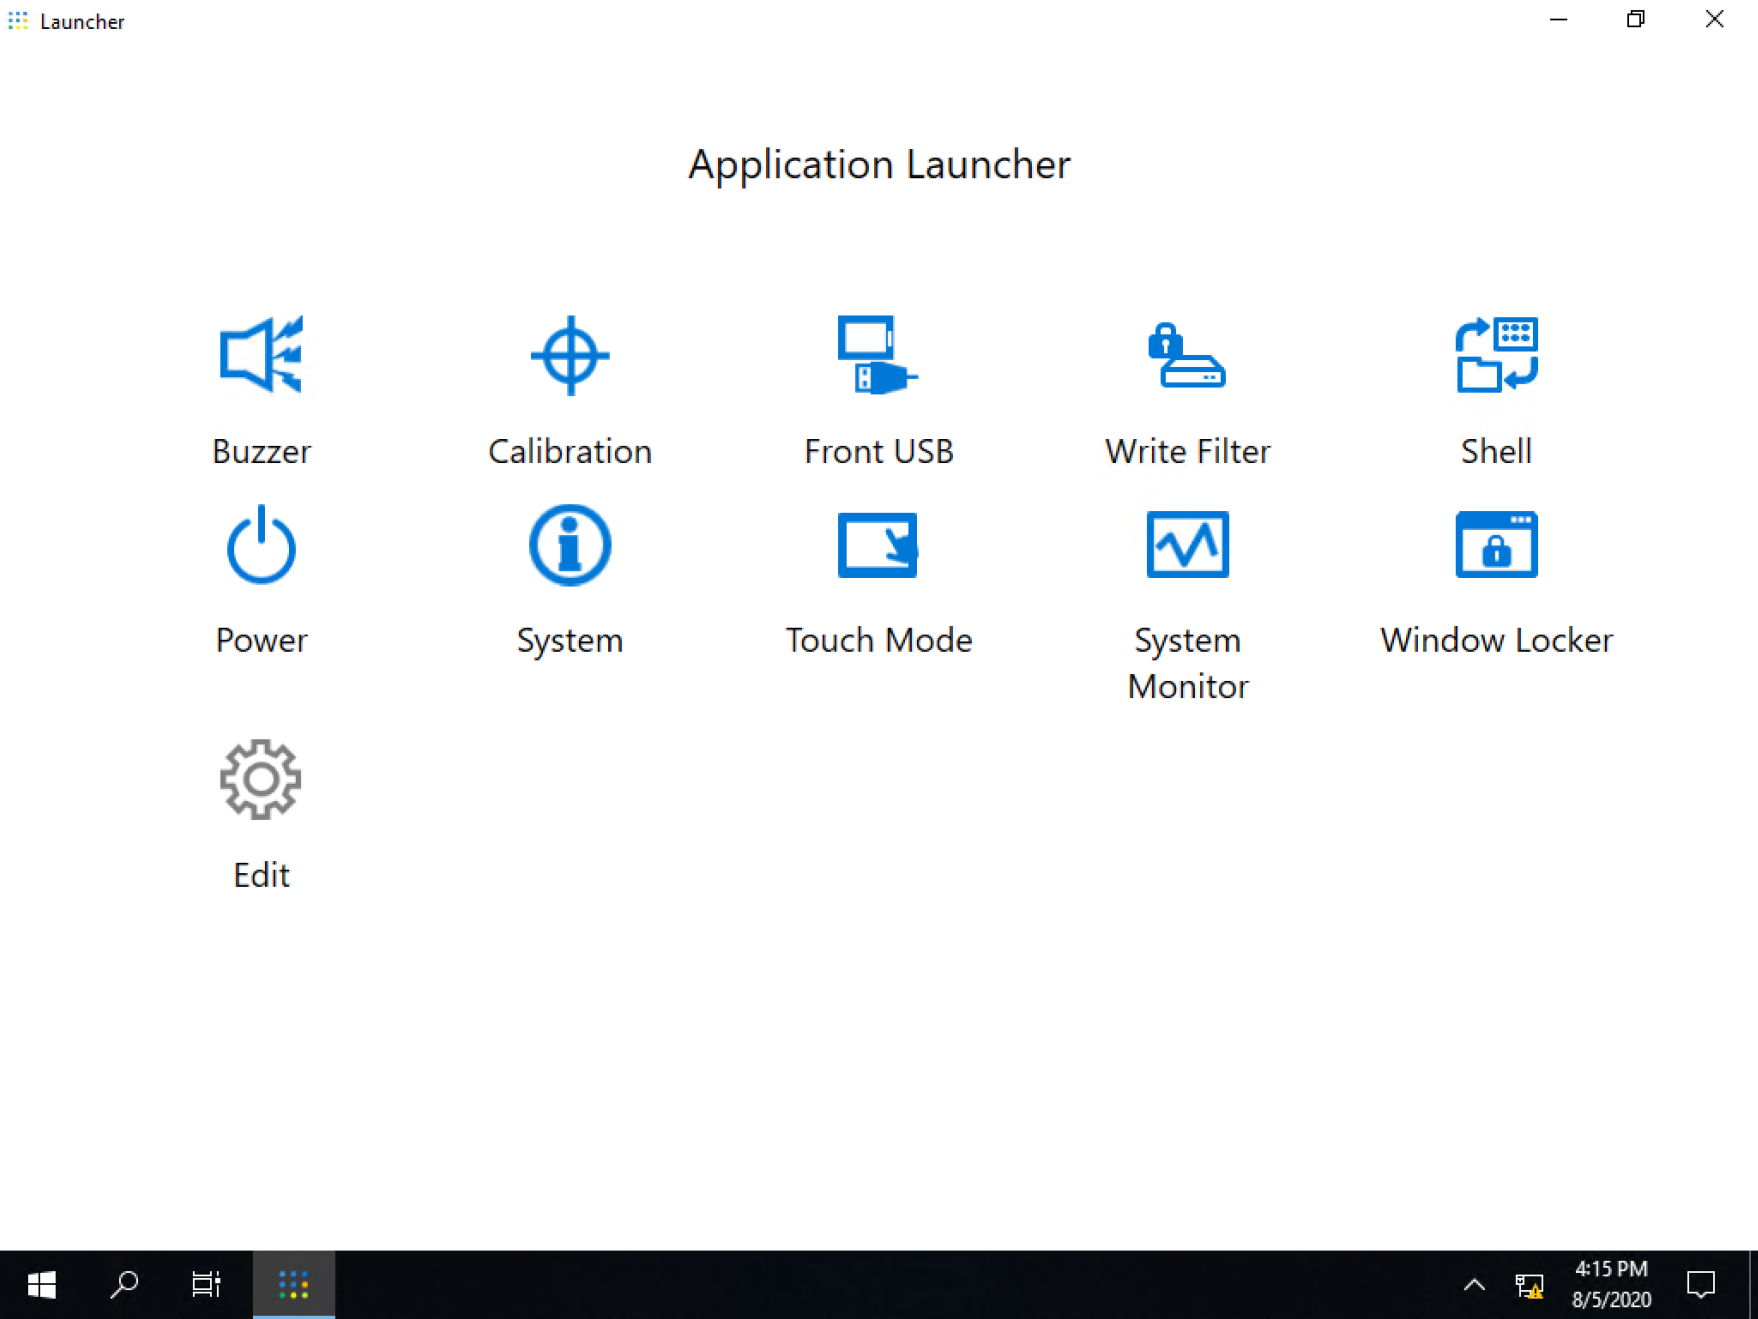
- Double-click on the Launcher shortcut on the desktop to start the Launcher.
- Click on the System Monitor icon of the Launcher to start System Monitor Dashboard.
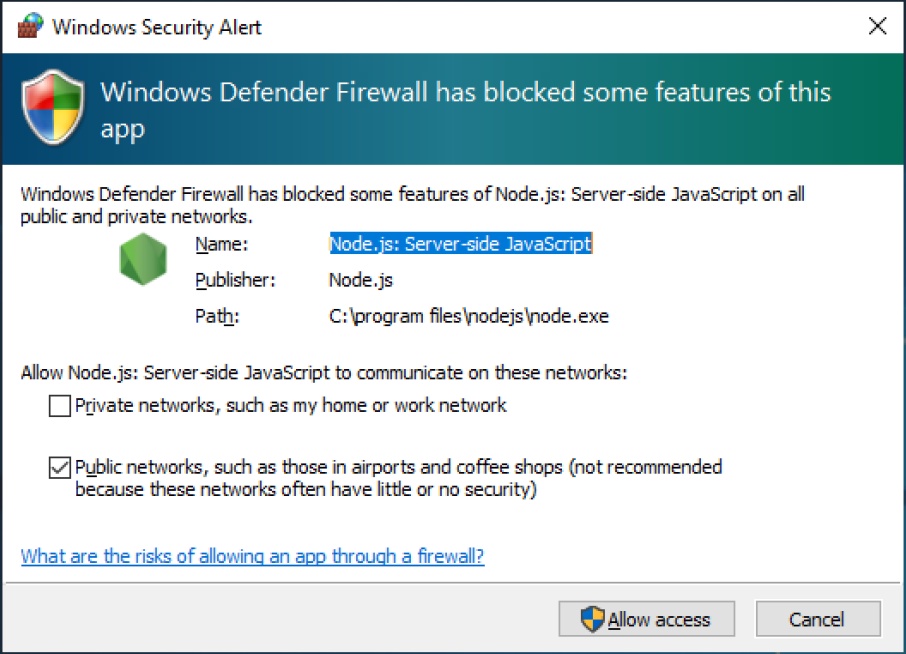
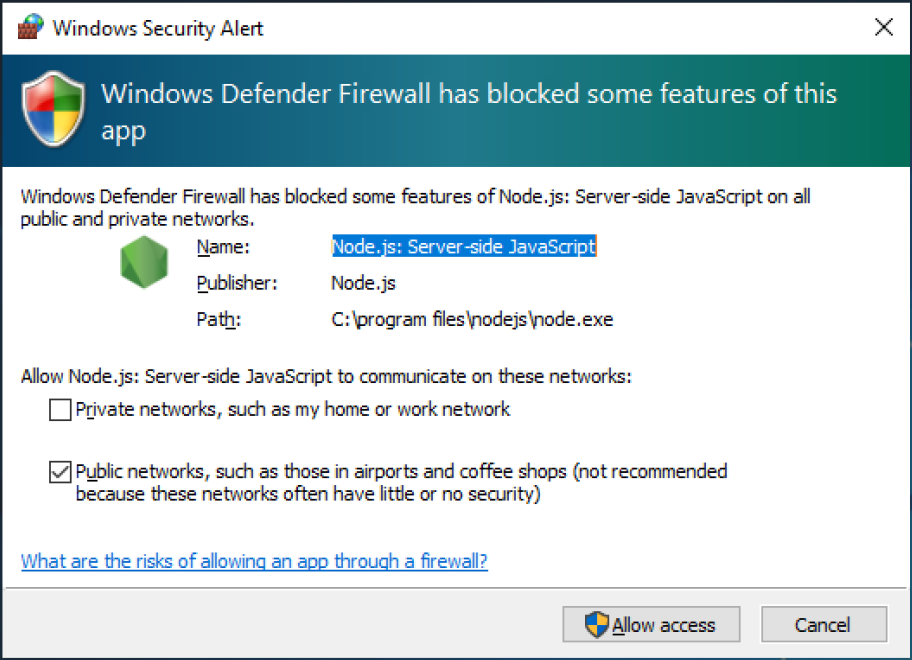
- The Windows Security Alert screen appears at the first startup. If you allow another PC on the network to access System Monitor Sample Dashboard, select [Allow access]. If you do not allow, select [Cancel].
- The internet browser opens and the System Monitor Dashboard appears.
How to edit System Monitor Sample Dashboard
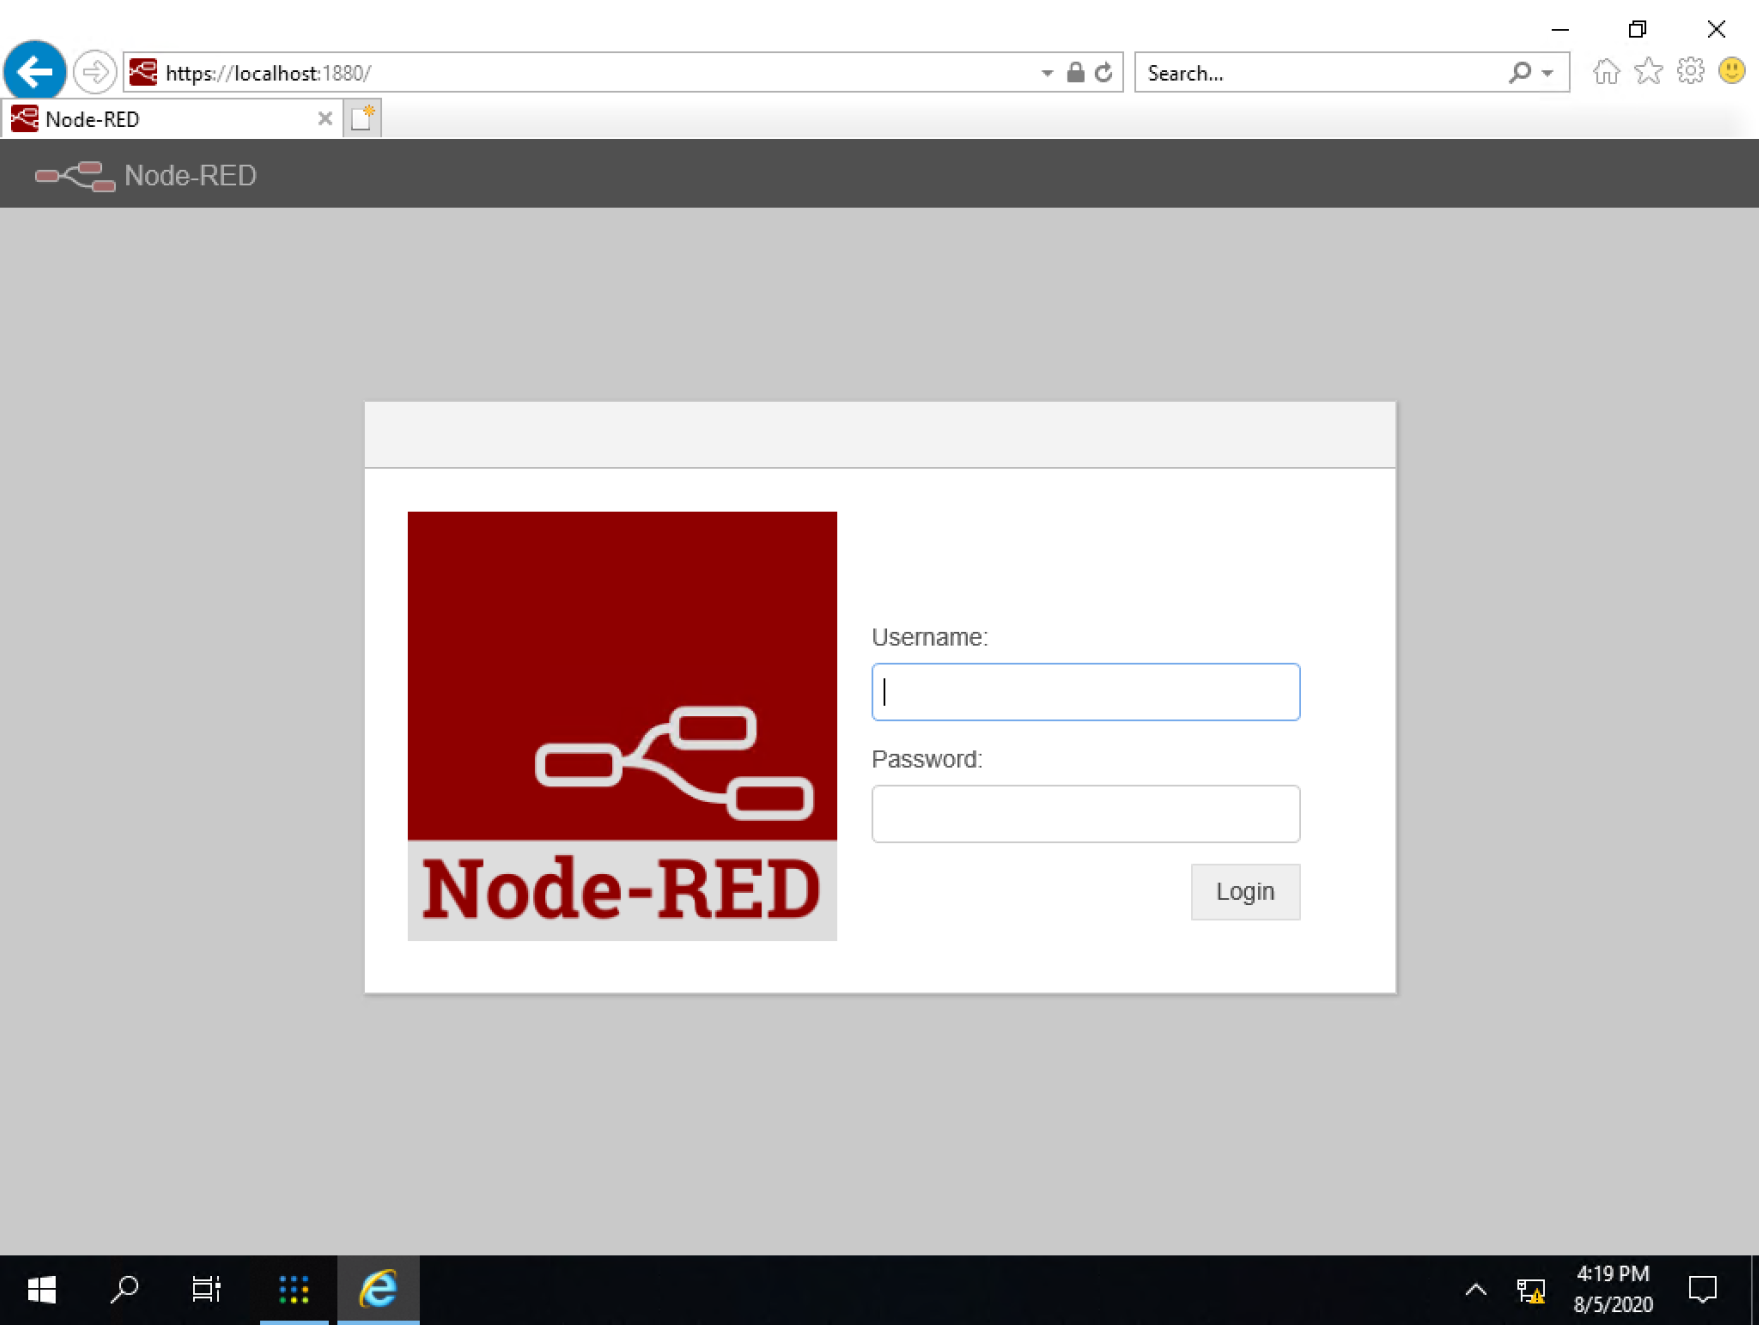
- To open the Node-RED flow editor, enter https://localhost:1880/ in the address bar of the internet browser. The username and password input screen will appear.
The default username is [admin] and the password is [Pw#12345].
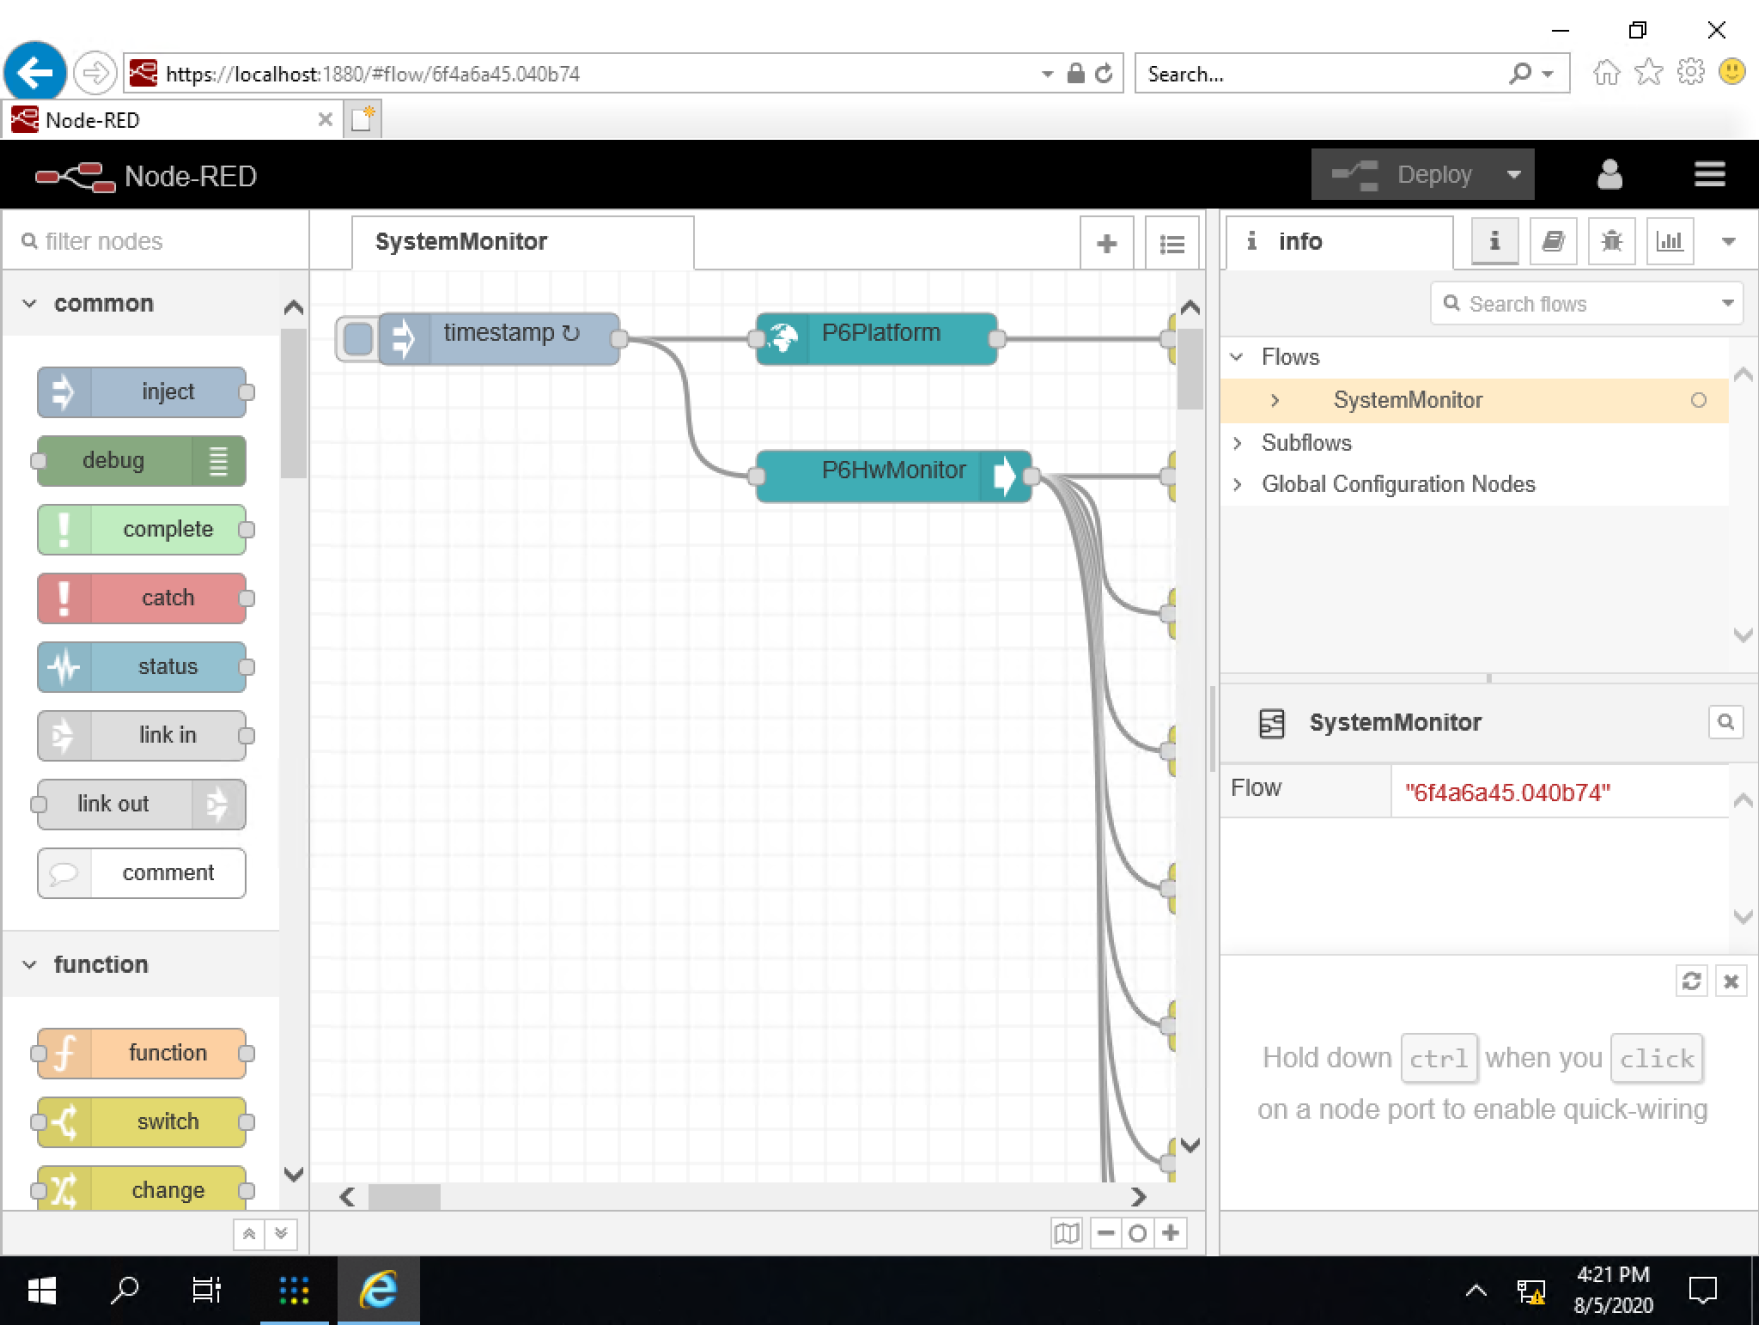
- Enter the username and password to open the flow editor.
- For details on Node-RED such as how to use the flow editor, refer to the user guide of Node-RED.
https://nodered.org/docs/user-guide/ - Change the default username and password right after the first login. For how to change the username and password, refer to Security Measures.
- If you log into the flow editor and close it without logout, the log-in state is retained for 7 days. When closing the editor screen, make sure that you log out. For how to change the retention period of log-in information, refer to Security Measures.
Important note for editing Node-RED Flow
- As flows created on Node-RED are retained in every user account, it is necessary to copy the flows to every user account with a user account with administrative rights.
- When a Standard User account only for usual operation is used, exit Node.js and update the flows by executing Node.js command prompt with administrative rights temporarily.
Dedicated Node for This Product
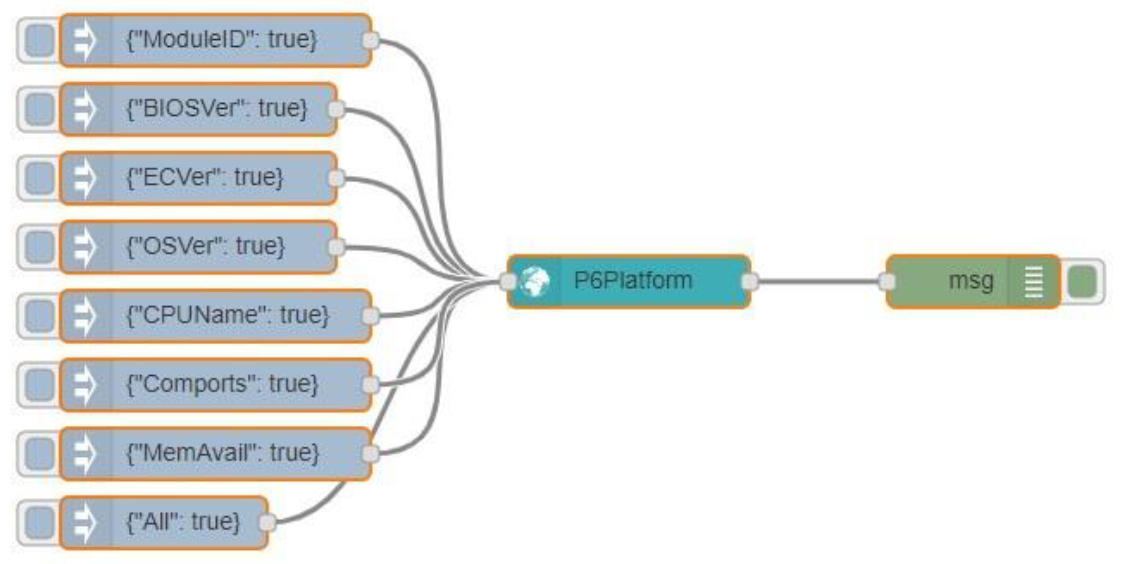
node-red-contrib-sep6platform
- A node for acquiring system information of this product For details, refer to %APPDATA%¥npm¥node_modules¥node-red-cotrib-sep6platform¥README.md of this product.
- Example of use
node-sep6platform
- A node that is internally used by the node-red-contrib-sep6platform
node-red-contrib-sep6sensor
- A node for acquiring sensor information of this product such as temperature, voltage, and consumption current.
- For details, refer to %APPDATA%¥npm¥node_modules¥node-red-cotrib-sep6sensor¥README.md of this product.
- Example of use
node-sep6sensor
- A node that is internally used by the node-red-contrib-sep6sensor
System Monitor API
API for Windows is available, and it can be used when you want to directly acquire sensor data from a user application without using System Monitor Sample Dashboard.
And also available a watchdog timer (WDT) API for monitoring application behavior.
Supported OS
- Windows 10 IoT Enterprise LTSC 2019 x64
The Watchdog Timer (WDT) function requires the following two conditions to be met
OS: Pre-installed OS version 2.0 or higher, or OS with the latest Dedicated Utility installed
BIOS: version WAR02 or higher
Development Environment
- Microsoft Visual Studio 2017 (C++)
Download file
- https://www.proface.com/en/download/ps6000/sysmonapi
- https://www.proface.com/en/download/ps6000/utility/dedicated_utility_for_ps6000_series
DLL Files
- C:\Windows\System32\SysMonApi.dll
- C:\Windows\SysWOW64\SysMonApi32.dll
- C:\Windows\System32\RasApi.dll
Note: DLL files are installed by a dedicated_utility_for_ps6000_series. If you need the DLL to install in your development environment, please contact your local distributer.
Header Files
- SysMonApi.h
- RAS_MappedFile.h (included from SysMonApi.h)
- RAS_API_PFXPHMIP6.h (for WDT functions)
Lib Files
- SysMonApi.lib ( for x64 application )
- SysMonApi32.lib ( for x86 application )
- RasApi.lib ( for WDT functions, for 64bit application )
Definition
| Identifier | Remark |
|---|---|
| RDI_Lib_Ver, | Lib version. ("x.x.x.x") |
| RDI_Temp_Mb_Min, | MB minimum temperature log data. (Celsius temperature) |
| RDI_Temp_Mb_Current, | MB temperature. (Celsius temperature) |
| RDI_Temp_Mb_Max, | MB maximum temperature log data. (Celsius temperature) |
| RDI_Temp_Cpu_Min, | CPU minimum temperature log data. (Celsius temperature) |
| RDI_Temp_Cpu_Current, | CPU temperature. (Celsius temperature) |
| RDI_Temp_Cpu_Max, | CPU maximum temperature log data. (Celsius temperature) |
| RDI_Temp_Cpu_Dts1, | CPU core 1 DTS. (Celsius temperature) |
| RDI_Temp_Cpu_Dts2, | CPU core 2 DTS. (Celsius temperature) |
| RDI_Temp_Cpu_Dts3, | CPU core 3 DTS. (Celsius temperature) |
| RDI_Temp_Cpu_Dts4, | CPU core 4 DTS. (Celsius temperature) |
| RDI_Temp_Cpu_Dts5, | CPU core 5 DTS. (Celsius temperature) |
| RDI_Temp_Cpu_Dts6, | CPU core 6 DTS. (Celsius temperature) |
| RDI_Temp_Cpu_Dts7, | CPU core 7 DTS. (Celsius temperature) |
| RDI_Temp_Cpu_Dts8, | CPU core 8 DTS. (Celsius temperature) |
| RDI_Temp_Hdd_Min, | HDD minimum temperature log data. (Celsius temperature) |
| RDI_Temp_Hdd_Current, | HDD temperature. (Celsius temperature) |
| RDI_Temp_Hdd_Max, | HDD maximum temperature log data. (Celsius temperature) |
| RDI_Volt_5VSTB, | 5VSTB voltage. (mV) |
| RDI_Volt_5V, | 5V voltage. (mV) |
| RDI_Volt_12V, | 12V voltage. (mV) |
| RDI_Volt_33V, | 3.3V voltage. (mV) |
| RDI_Mcu_Ver, | MCU version number. ("xxxx") |
| RDI_Mcu_Poh, | MCU power-on hours. (Hours) |
| RDI_Mcu_Mcot, | MCU most continuous power-on time. (Hours) |
| RDI_Mcu_Pwon_Count, | MCU power on counts. (Number of times) |
| RDI_Psu_Watt, | PSU watt value. (mW) |
| RDI_Psu_Current, | PSU current value. (mA) |
| WDT_STOP | WDT status stop |
| WDT_COUNTING | WDT status counting |
| WDT_TIMEOUT | WDT status timeout |
| WDT_HWRESET_DISABLE | WDT hardware reset disable |
| WDT_HWRESET_ENABLE | WDT hardware reset enable |
Function Reference
- SysMonGetLibVersion()
SYSMON_API BOOL WINAPI SysMonGetLibVersion ( char * pchStr )
API function for get RAS library version from sysmonsrv.
Parameters
pchStr : Pointer to buffer address for store data.
Returns
TRUE : Success.
FALSE : Error. - SysMonGetCurrentValue()
SYSMON_API BOOL WINAPI SysMonGetCurrentValue ( int iSelector, int * piValue )
API function for get current values.
Parameters
iSelector : Type of sensor etc. (RDI_XXX_)
piValue : Pointer to buffer address for store data.
Returns
TRUE : Success.
FALSE : Error. - SysMonGetLogValue()
SYSMON_API BOOL WINAPI SysMonGetLogValue ( int iSelector, int * piValue, struct tm * pstTime )
API function for get log values.
Parameters
iSelector : Type of sensor. (RDI_TEMP_xx_MIN_, RDI_TEMP_xx_MAX_).
piValue : Pointer to buffer address for store data.
pstTime : Pointer to buffer address for log time.
Returns
TRUE : Success.
FALSE : Error. - SysMonGetWarningFlag()
SYSMON_API BOOL WINAPI SysMonGetWarningFlag ( int iSelector, int * plFlag )
API function for get warning flag.
Parameters
iSelector : Type of sensor. (RDI_XXX_).
piFlag : Pointer to buffer address for store data. RAS_WARNING_ or RAS_NOT_WARNING_
Returns
TRUE : Success.
FALSE : Error. - SysMonGetIsWarning()
SYSMON_API BOOL WINAPI SysMonGetIsWarning ( int * piFlag )
API function to determine whether the warning flag is valid.
Parameters
piFlag : Pointer to buffer address for store data. RAS_WARNING_ or RAS_NOT_WARNING_
Returns
TRUE : Success.
FALSE : Error. - RAS_SetWDTCounter()
DLL_API BOOL RAS_SetWDTCounter ( int iValue )
Set WDT counter values.
Parameters
iValue : Counter value (1 - 65535 sec).
Returns
TRUE : Success.
FALSE : Error. - RAS_StopWDTCounter()
DLL_API BOOL RAS_StopWDTCounter ( void )
Stop WDT counter countdown.
Parameters
void :
Returns
TRUE : Success.
FALSE : Error. - RAS_GetWDTStatus()
DLL_API BOOL RAS_GetWDTStatus ( int * iState )
Get WDT status.
Parameters
iState : Pointer to return status.
Returns
TRUE : Success.
FALSE : Error. - RAS_ClrWDTTimeoutStatus()
DLL_API BOOL RAS_ClrWDTTimeoutStatus ( void )
Clear WDT timeout status.
Parameters
void :
Returns
TRUE : Success.
FALSE : Error. - RAS_SetWDTResetMask()
DLL_API BOOL RAS_SetWDTResetMask ( int iMask )
Set WDT reset mask.
Parameters
iMask : WDT_HWRESET_DISABLE or WDT_HWRESET_ENABLE
Returns
TRUE : Success.
FALSE : Error. - RAS_GetWDTResetMask()
DLL_API BOOL RAS_GetWDTResetMask ( int * iMask )
Get WDT reset mask.
Parameters
iMask : Pointer to return value.
Returns
TRUE : Success.
FALSE : Error.
System Monitor FAQ
Remote connection (Refer to System Monitor from an external PC.)
- Enabling communication of [Node.js Server-side JavaScript] in the Firewall setting is required at the first startup of System Monitor from Launcher.
Access the IP address of this product with an external PC’s browser application.
Example) https://ipaddress:1880/ui - To make a remote connection from an external PC, Node.js and Node-RED need to be running on this product.
Unable to draw graphs when remotely connected
- Check the clock setting of this product.
Timezone and clock information need to be properly set. The timezone in pre-installed OS on this product is set to UTC by default. Change the timezone and correctly set a local time of the area where this product is used.
16DI/8DO API
This API provides input/output functions with a 16DI/8DO optional interface.
Supported Product
- 16DI/8DO Optional interface (PFXYP6MPX16Y8)
Supported OS
- Windows 10 IoT Enterprise LTSC 2019
Development Environment
- Microsoft Visual Studio 2017 (C++ / C# / VB)
- Microsoft .NET Framework 4.8 (C# / VB)
Download file
Sample Code
- For C# and VB environment
Please refer to PFXPHMIP6_DIDO_SampleCode folder.
PFXPHMIP6_DIDO_SampleCode.sln
PFXPHMIP6_DIDO_SampleCode_CS.csproj Sample Code for C#
PFXPHMIP6_DIDO_SampleCode_VB.vbproj Sample Code for Visual Basic
DLL Files
- DIDO_PFXPHMIP6.dll For 64bit application.
- DIDO_PFXPHMIP6_32.dll For 32bit application.
Header Files
- For C++ environment
DIDO_PFXPHMIP6.h
Lib Files
- DIDO_PFXPHMIP6.lib For 64bit application.
- DIDO_PFXPHMIP6_32.lib For 32bit applcation.
Definition
| Category | Identifier | Remark |
|---|---|---|
| Error code | SERI_ERROR_FAIL_ | Error. |
| SERI_ERROR_OK_ | No error. | |
| SERI_ERROR_RESPONSE_ | Response error. | |
| SERI_ERROR_COMM_TIMEOUT_ | Set comm timeout error. | |
| SERI_ERROR_HANDLE_ | Handle error. | |
| SERI_ERROR_PARAM_ | Parameter error. | |
| Counter ID | DIDO_COUNTER0_ | Counter 0. |
| DIDO_COUNTER1_ | Counter 1. | |
| Control code | DIDO_COUNTER_RESET_ | Reset Counter. |
| DIDO_COUNTER_START_ | Start Counter. | |
| DIDO_COUNTER_STOP_ | Stop Counter. | |
| DIDO_COUNTER_RESTART_ | Restart Counter. | |
| DIDO_COUNTER_MODE_RISING_ | Counter mode Rising. | |
| DIDO_COUNTER_MODE_FALLING_ | Counter mode Falling. | |
| DIDO_COUNTER_MODE_BOTH_ | Counter mode Both. | |
| DIDO_COUNTER_DEBOUNCE_ENABLE_ | Counter debounce enable. | |
| DIDO_COUNTER_DEBOUNCE_DISABLE_ | Counter debounce disable. |
Function Reference
- OpenDido()
HANDLE OpenDido(void)
Open DIDO function.
Parameters
void :
Returns
HANDLE : Handle of DIDO device. - CloseDido()
void CloseDido(HANDLE hComHandle)
DIDO Close function.
Parameters
HANDLE : Handle of DIDO device.
Returns
void: - GetFwVersion()
int GetFwVersion(HANDLE hHandle, PTCHAR ptcBl, PTCHAR ptcApp)
DIDO GetFwVersion function.
Parameters
HANDLE : Handle of DIDO device.
PTCHAR : Pointer to get version of the Bootloader.
PTCHAR : Pointer to get version of the Bootloader.
Returns
int : Error code. SERI_ERROR_xxx_ - SetDout()
int SetDout(HANDLE hHandle, BYTE byData)
DIDO set dout port function.
Parameters
HANDLE : Handle of DIDO device.
BYTE : Dout data.
Returns
int : Error code. SERI_ERROR_xxx_ - SetDoutDefault()
int SetDoutDefault(HANDLE hHandle, BYTE byData)
DIDO set dout port default value function.
Parameters
HANDLE : Handle of DIDO device.
BYTE : Dout data.
Returns
int : Error code. SERI_ERROR_xxx_ - GetDout()
int GetDout(HANDLE hHandle, PBYTE pbyData)
DIDO get dout port function.
Parameters
HANDLE : Handle of DIDO device.
PBYTE : Potinter to get Dout data.
Returns
int : Error code. SERI_ERROR_xxx_ - GetDin()
int GetDin(HANDLE hHandle, PWORD pwData)
DIDO get din port function.
Parameters
HANDLE : Handle of DIDO device.
PWORD : Potinter to get Din data.
Returns
int : Error code. SERI_ERROR_xxx_ - GetCounter()
int GetCounter(HANDLE hHandle, int iCounterId, PDWORD pdwData)
DIDO get counter value function.
Parameters
HANDLE : Handle of DIDO device.
int : ID of counter. DIDO_COUNTER0_ or DIDO_COUNTER1_
PDWORD : Pointer to get counter value.
Returns
int : Error code. SERI_ERROR_xxx_ - SetCounter()
int SetCounter(HANDLE hHandle, int iCounterId, int iControl)
DIDO counter contrl function.
Parameters
HANDLE : Handle of DIDO device.
int : ID of counter. DIDO_COUNTER0_ or DIDO_COUNTER1_
int : Control code. DIDO_COUNTER_xxx_
Returns
int : Error code. SERI_ERROR_xxx_

